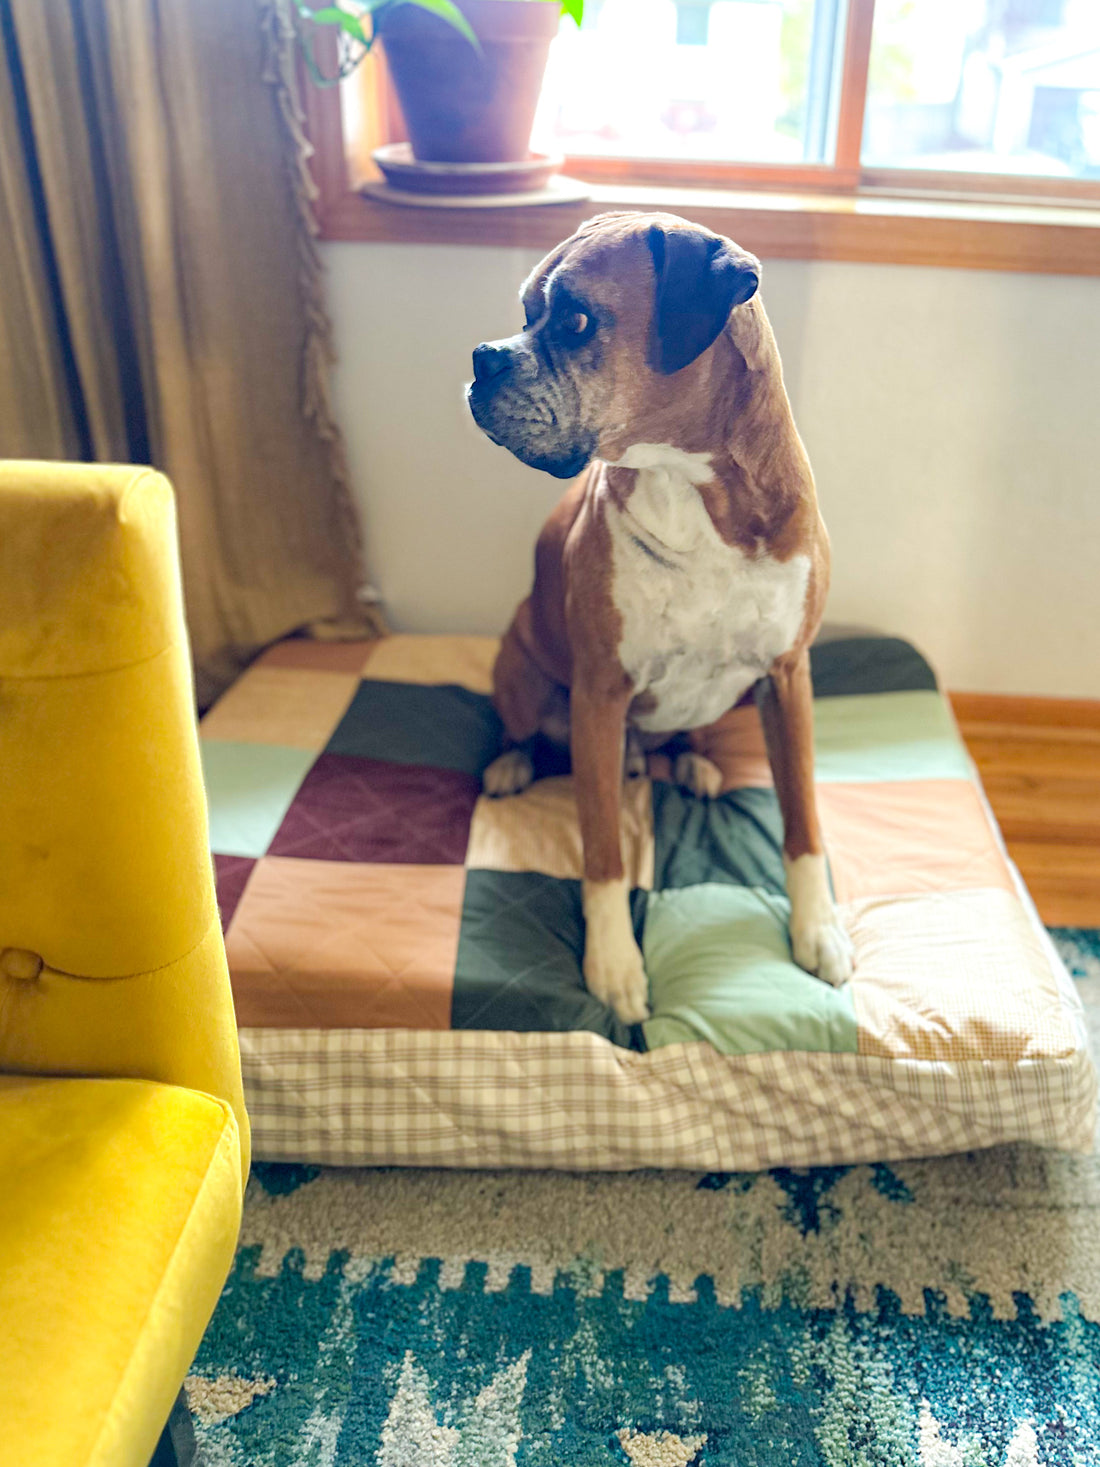
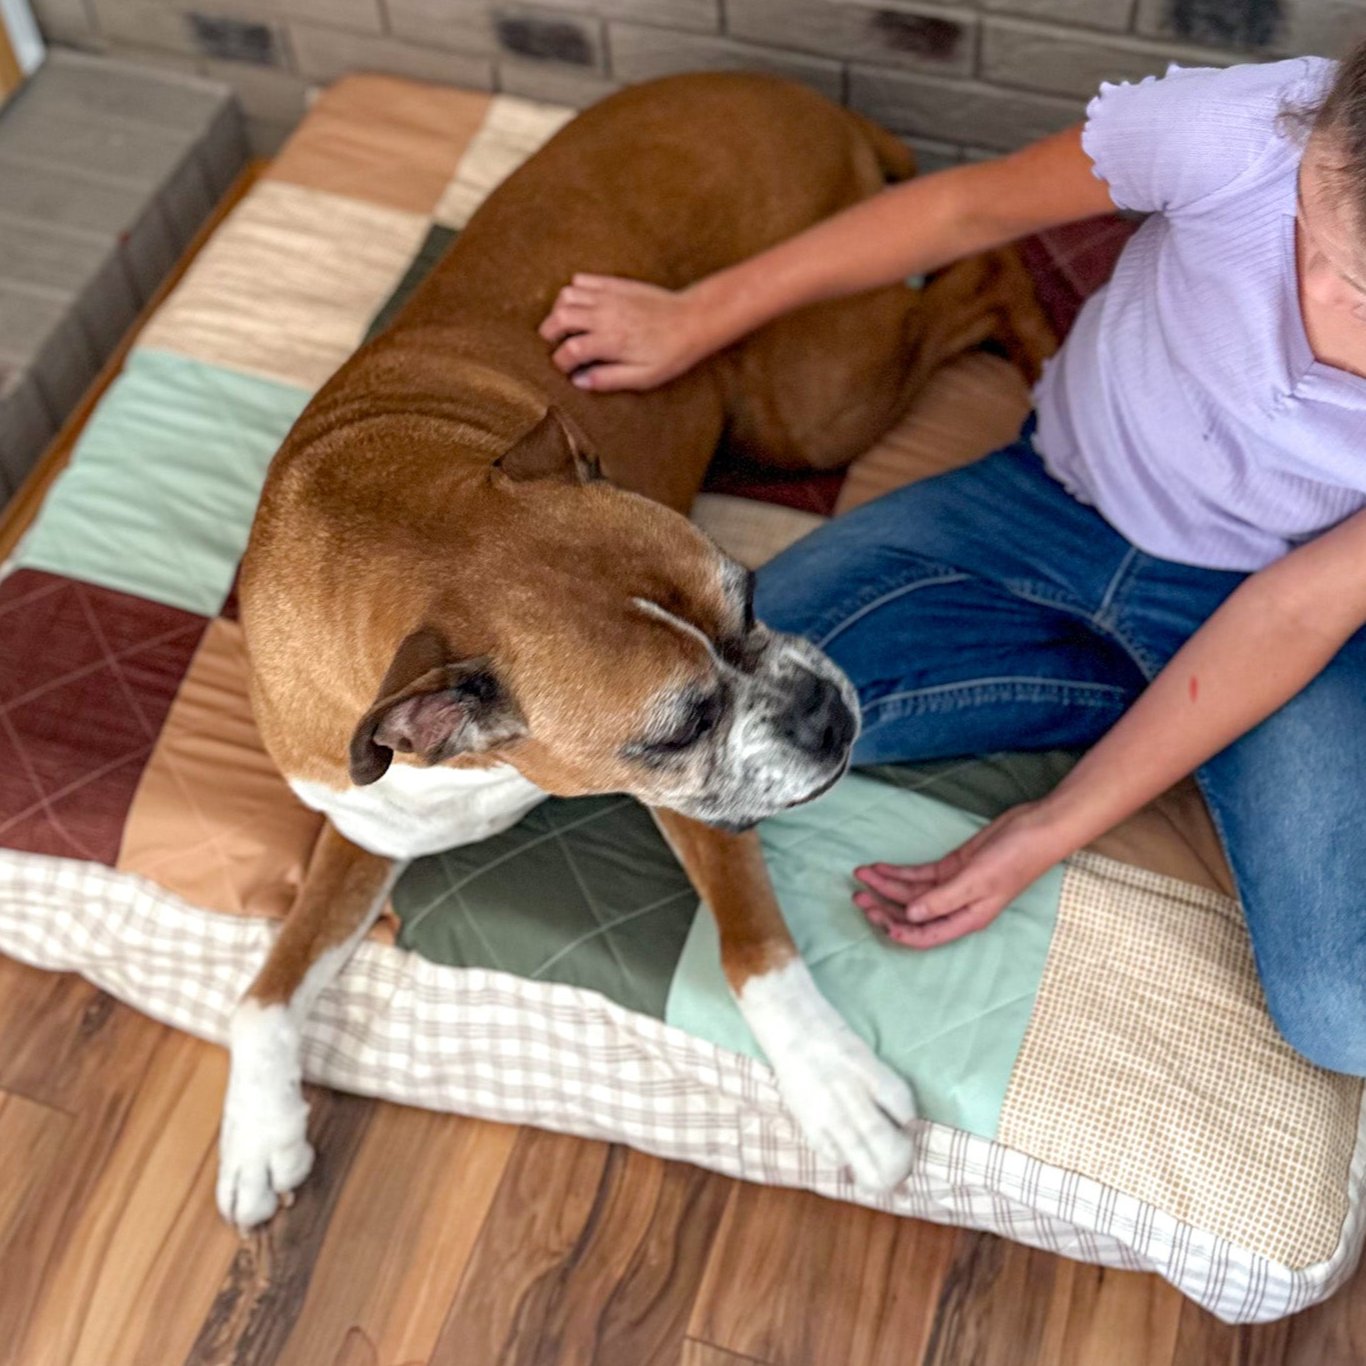
Are you tired of your furry friend hogging the bed at night? Why not make them their very own cozy spot with a DIY quilted dog bed! Not only will your pup love it, but you'll also have a fun project to work on. Let's dive into this pawsitively adorable tutorial! This tutorial offers options for 3 bed sizes - Small (14" x 18"), Medium (22" x 38"), and Large (30" x 38"). I made the large size for our boxer and it gives him lots of wiggle room!
Tutorial: DIY Quilted Dog Bed
What You'll Need:
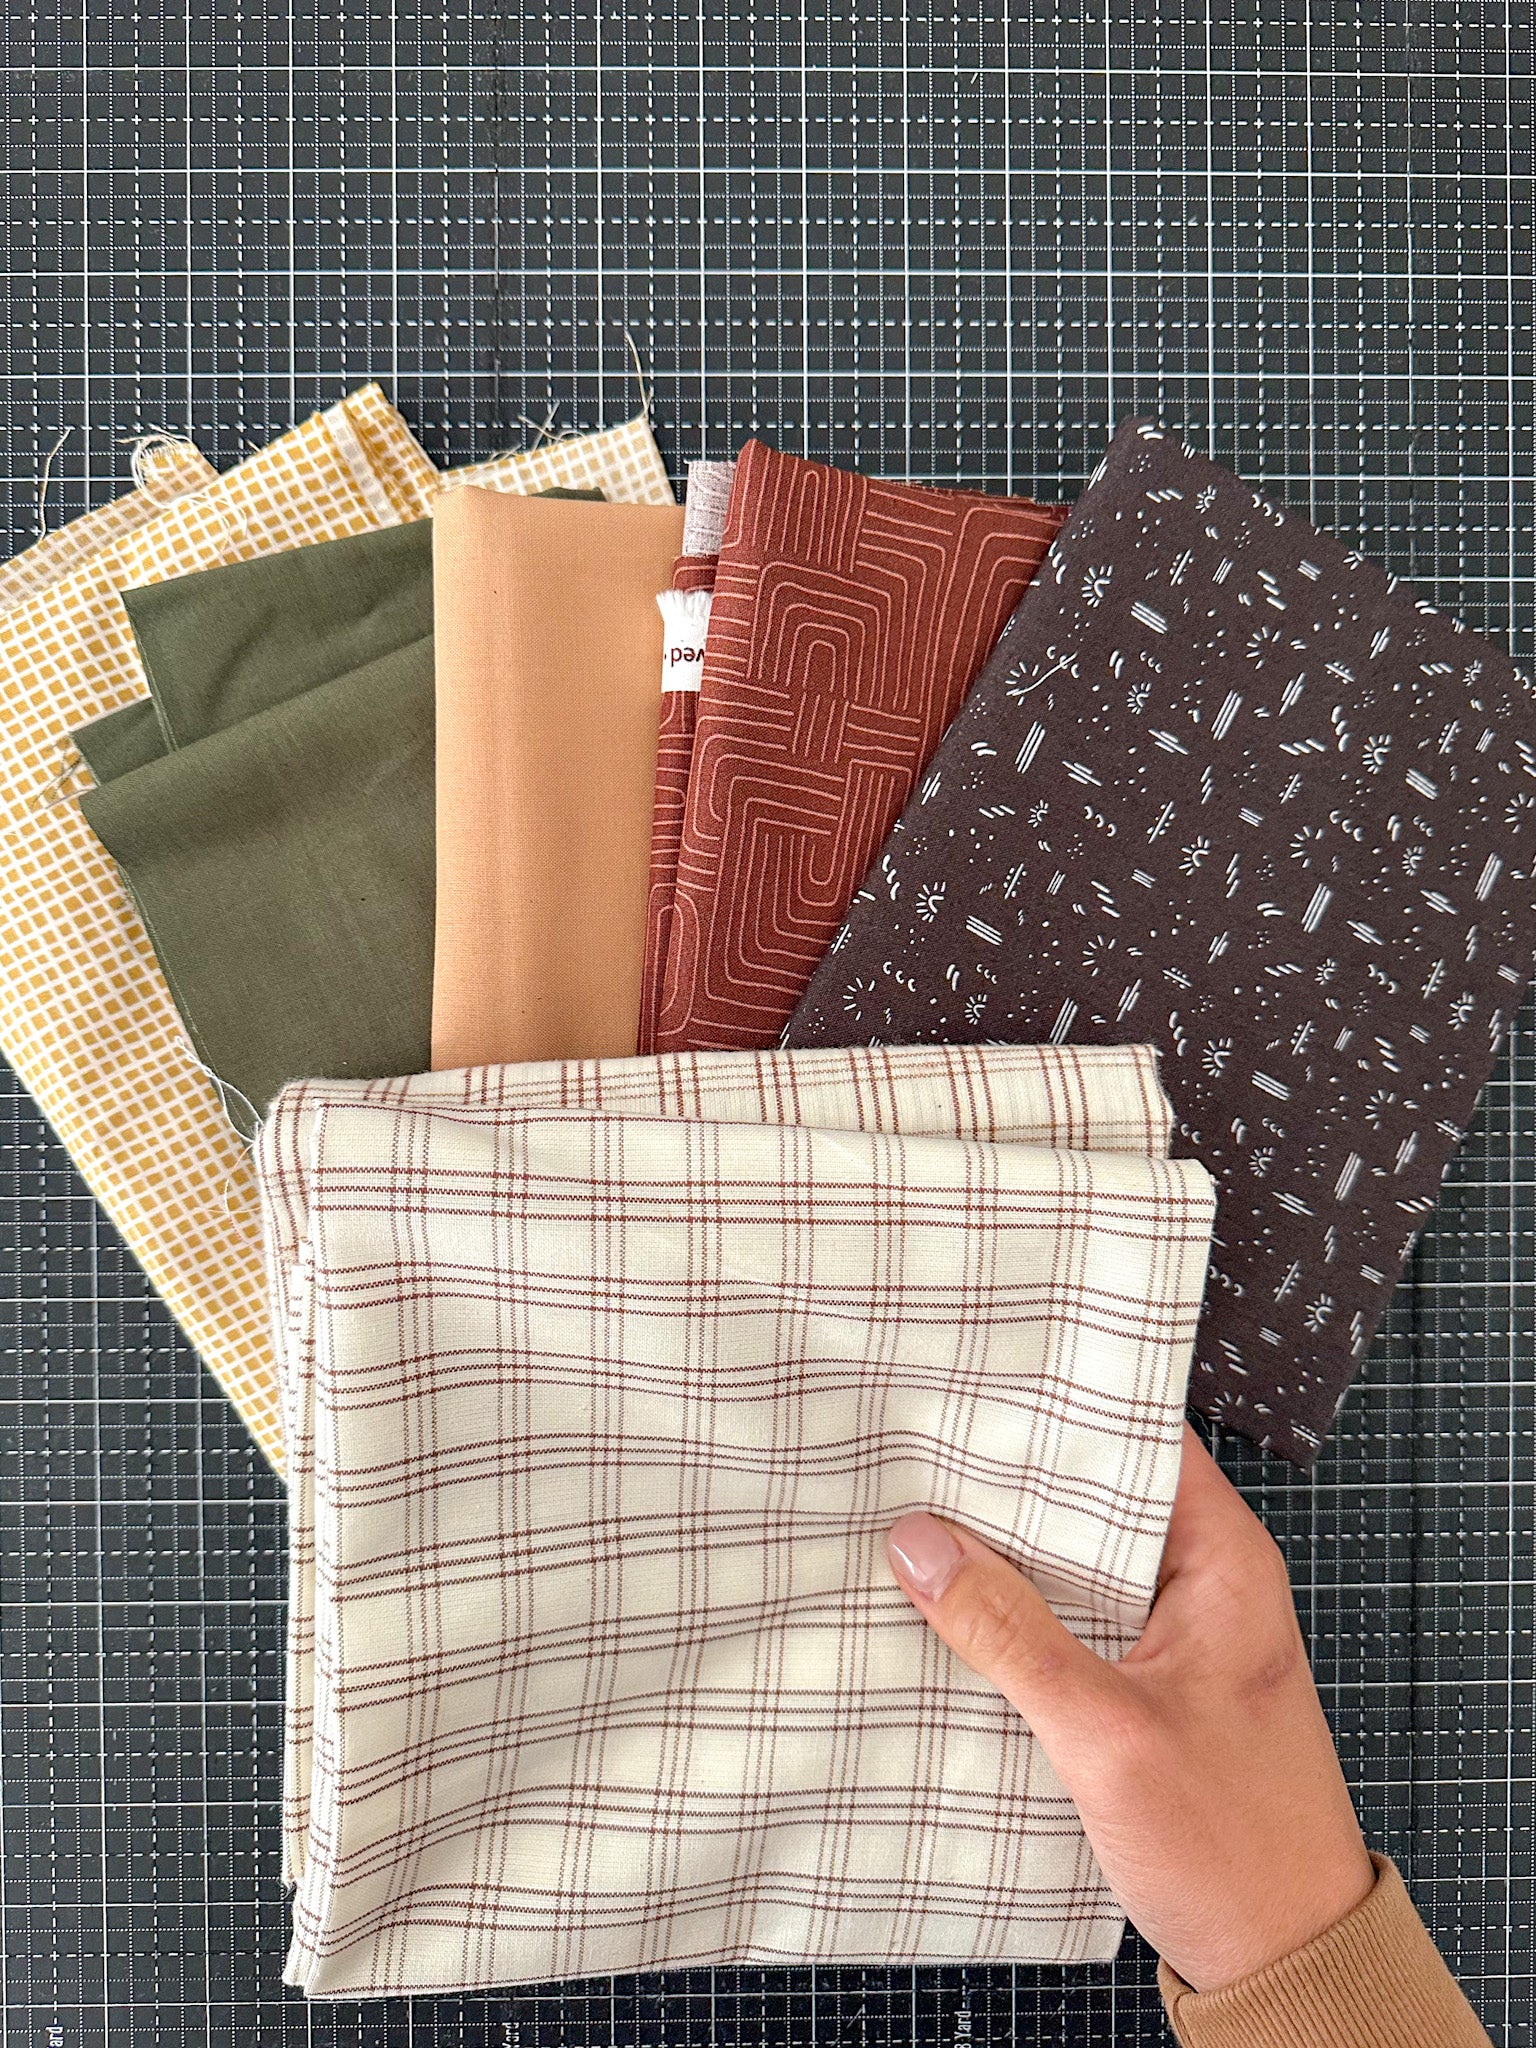
First things first, gather your materials. You'll need fabric scraps, foam filling for extra fluffiness, a sewing machine (this is the one I use), and of course, some treats for motivation (for you, not the dog).
Fabric Requirements (Large Dog Bed):
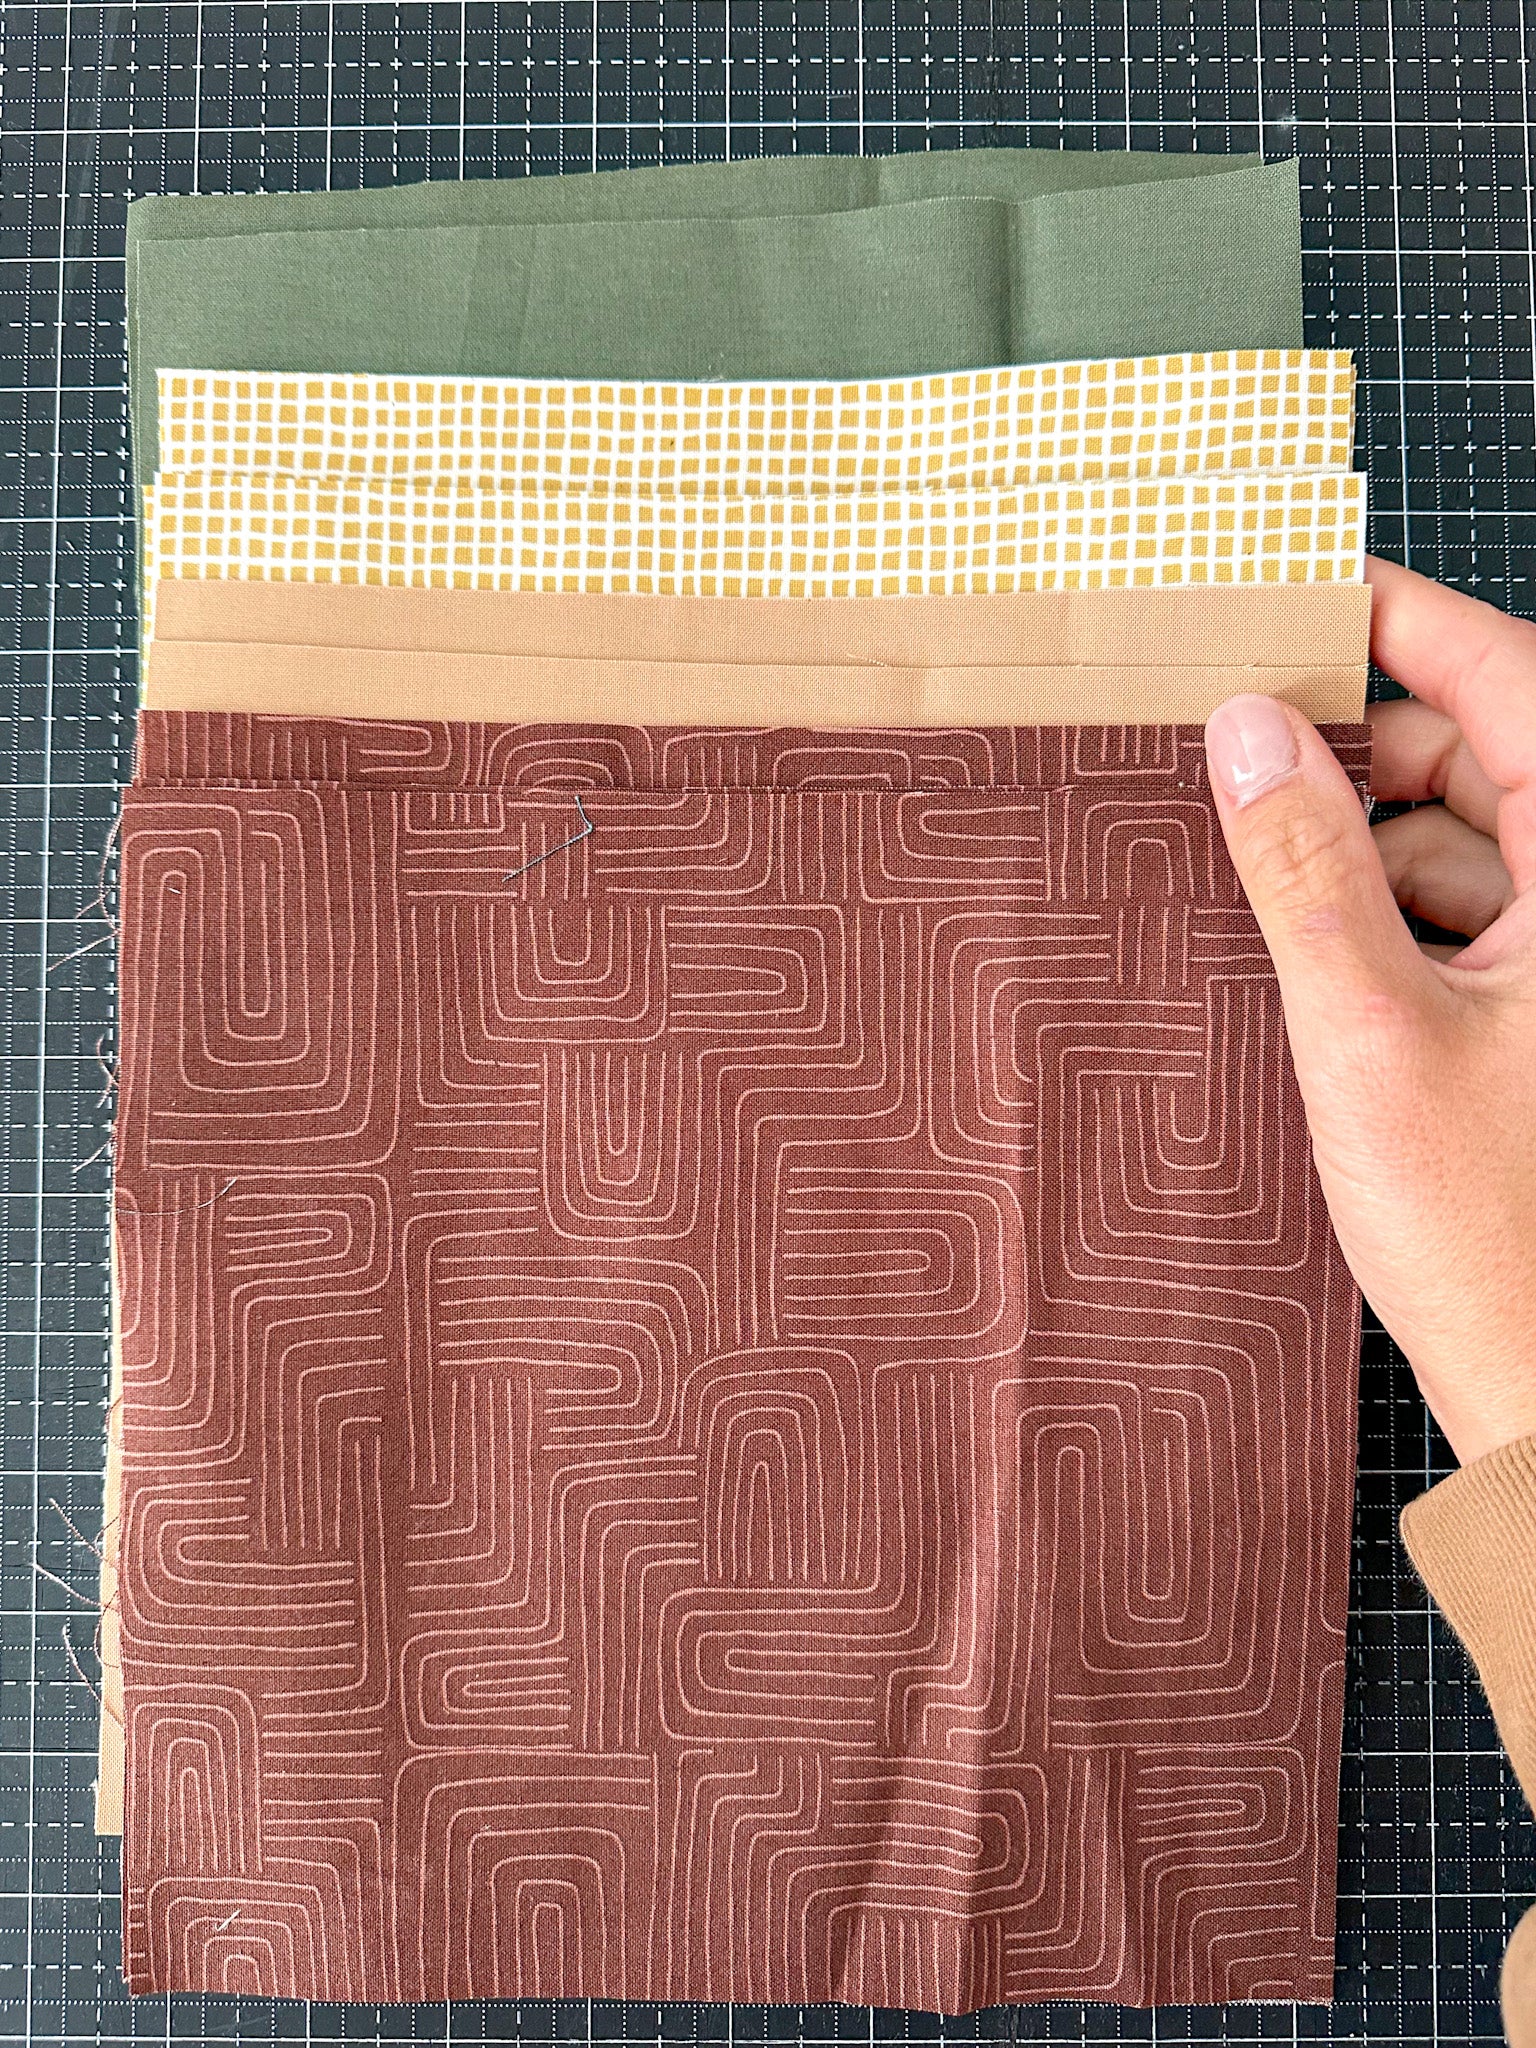
- (20) 8" x 8" scraps of fabric (6" x 6" for medium bed, 4" x 4" for small bed)
- Backing fabric (Large - 42" x 48, Medium - 34" x 40", Small - 26" x 30")
- foam filling - 6" thick, this roll can be used in all 3 size options
- Batting scraps
Supplies:
- Ruler
- Cutting mat
- Scissors or rotary cutter
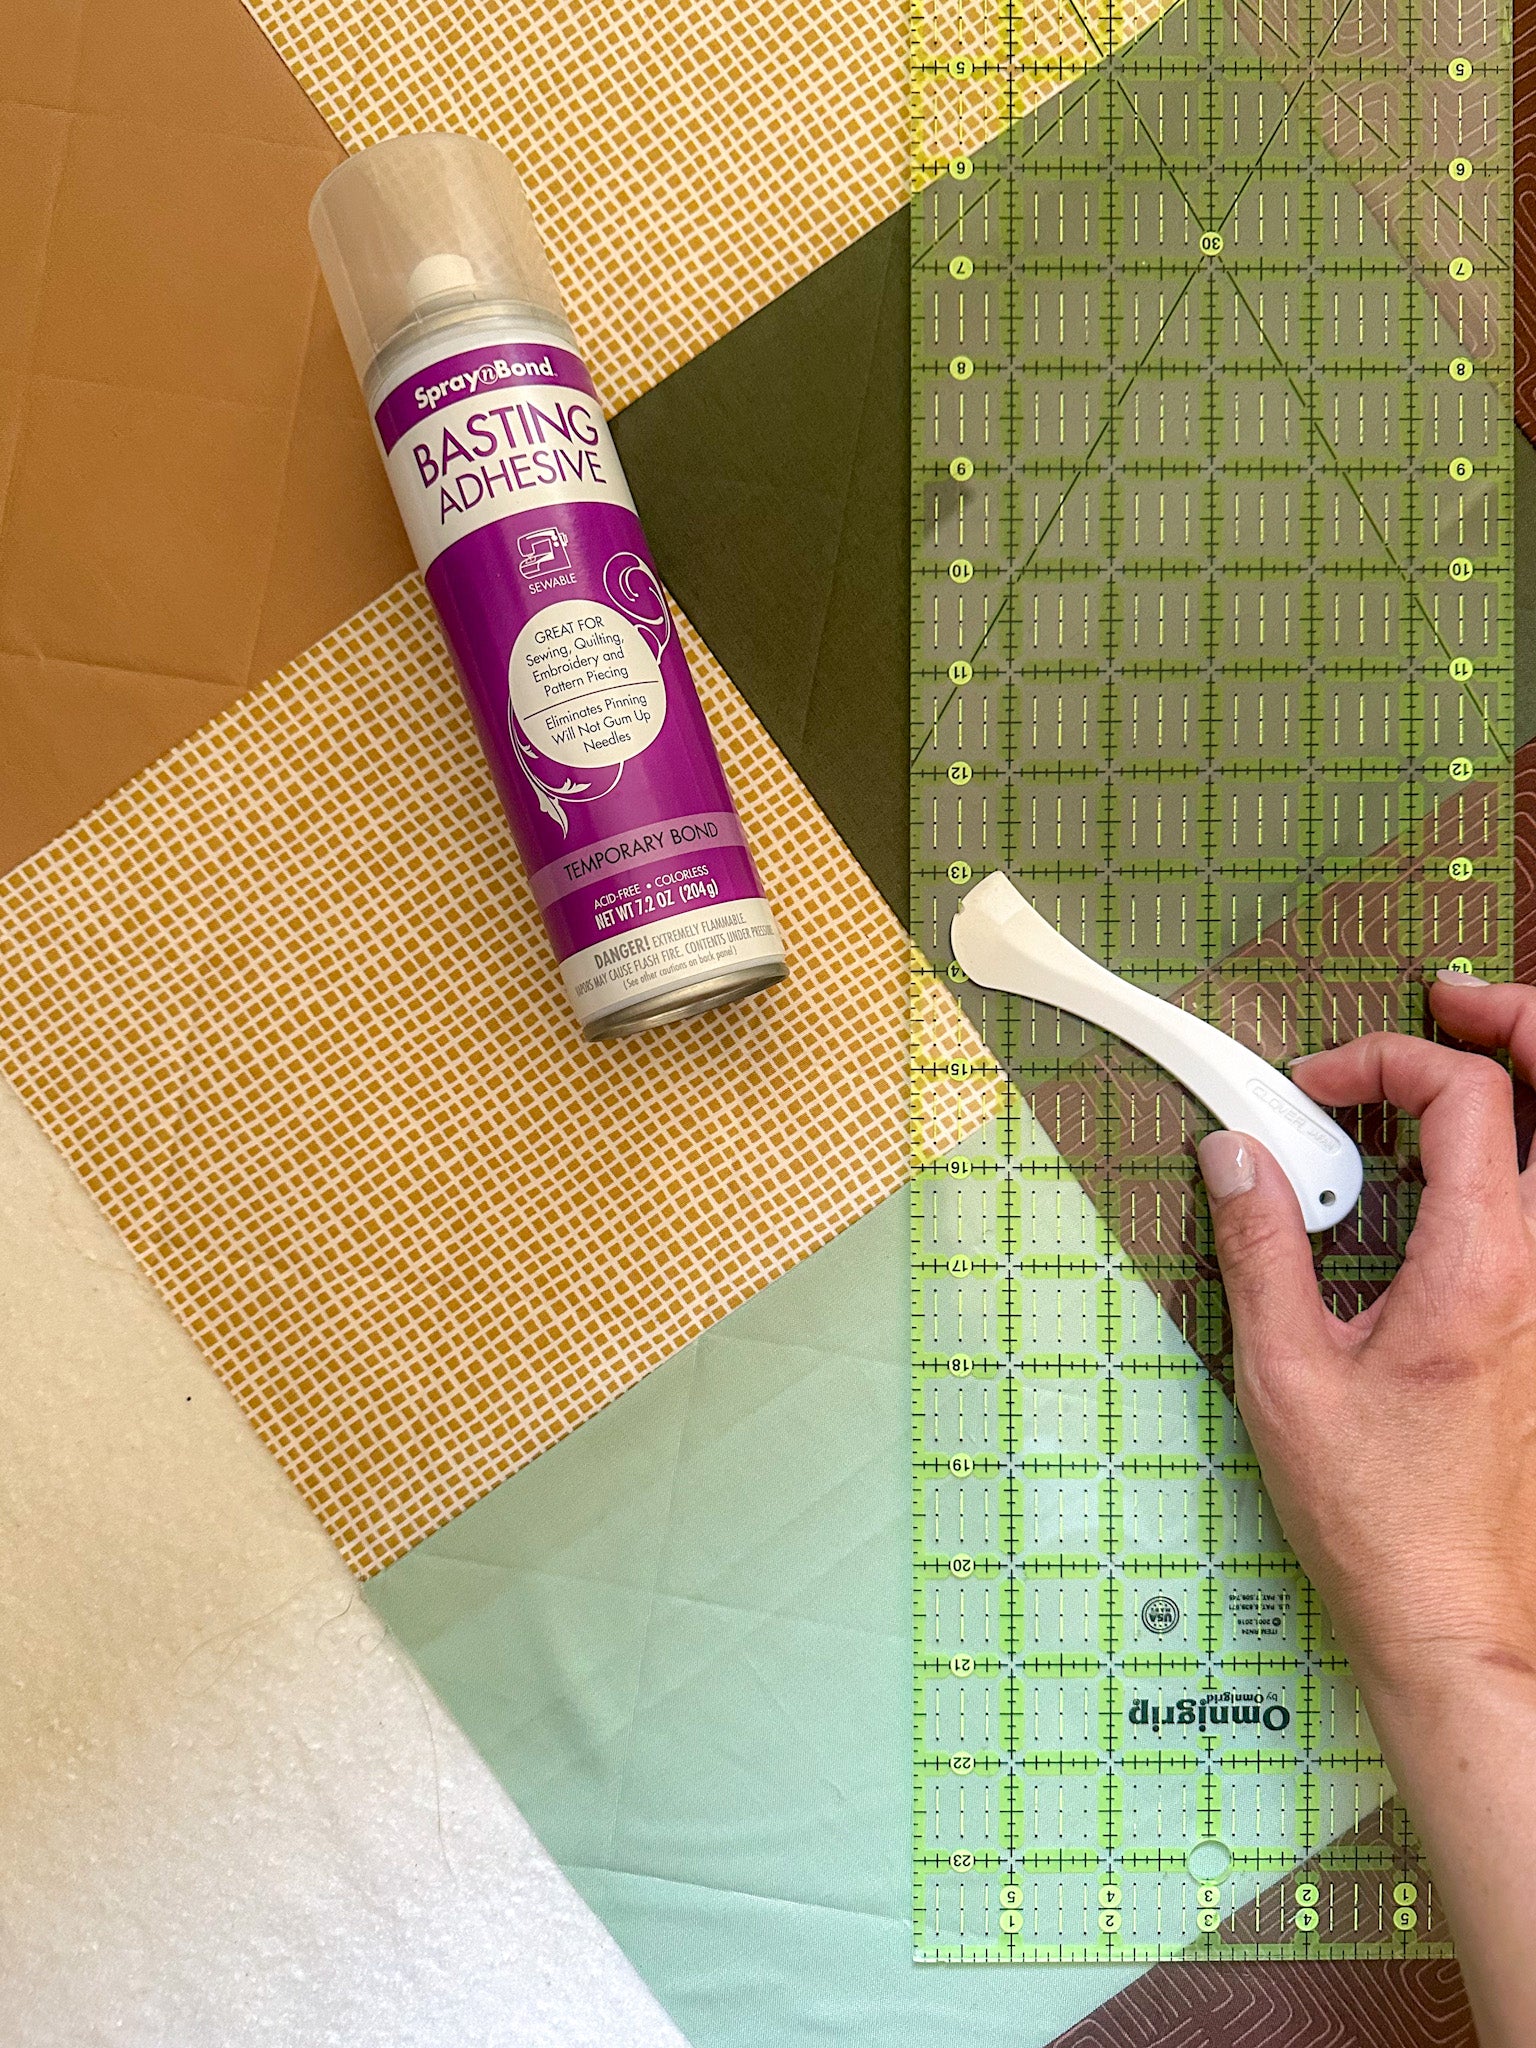
- Basting spray
- Wonder clips — These are a must in this project!
- Hera marker
- Sewing machine (this is the one I sew with - it is reasonably priced, and has been able to handle every project I've tried on it!)
- Thread
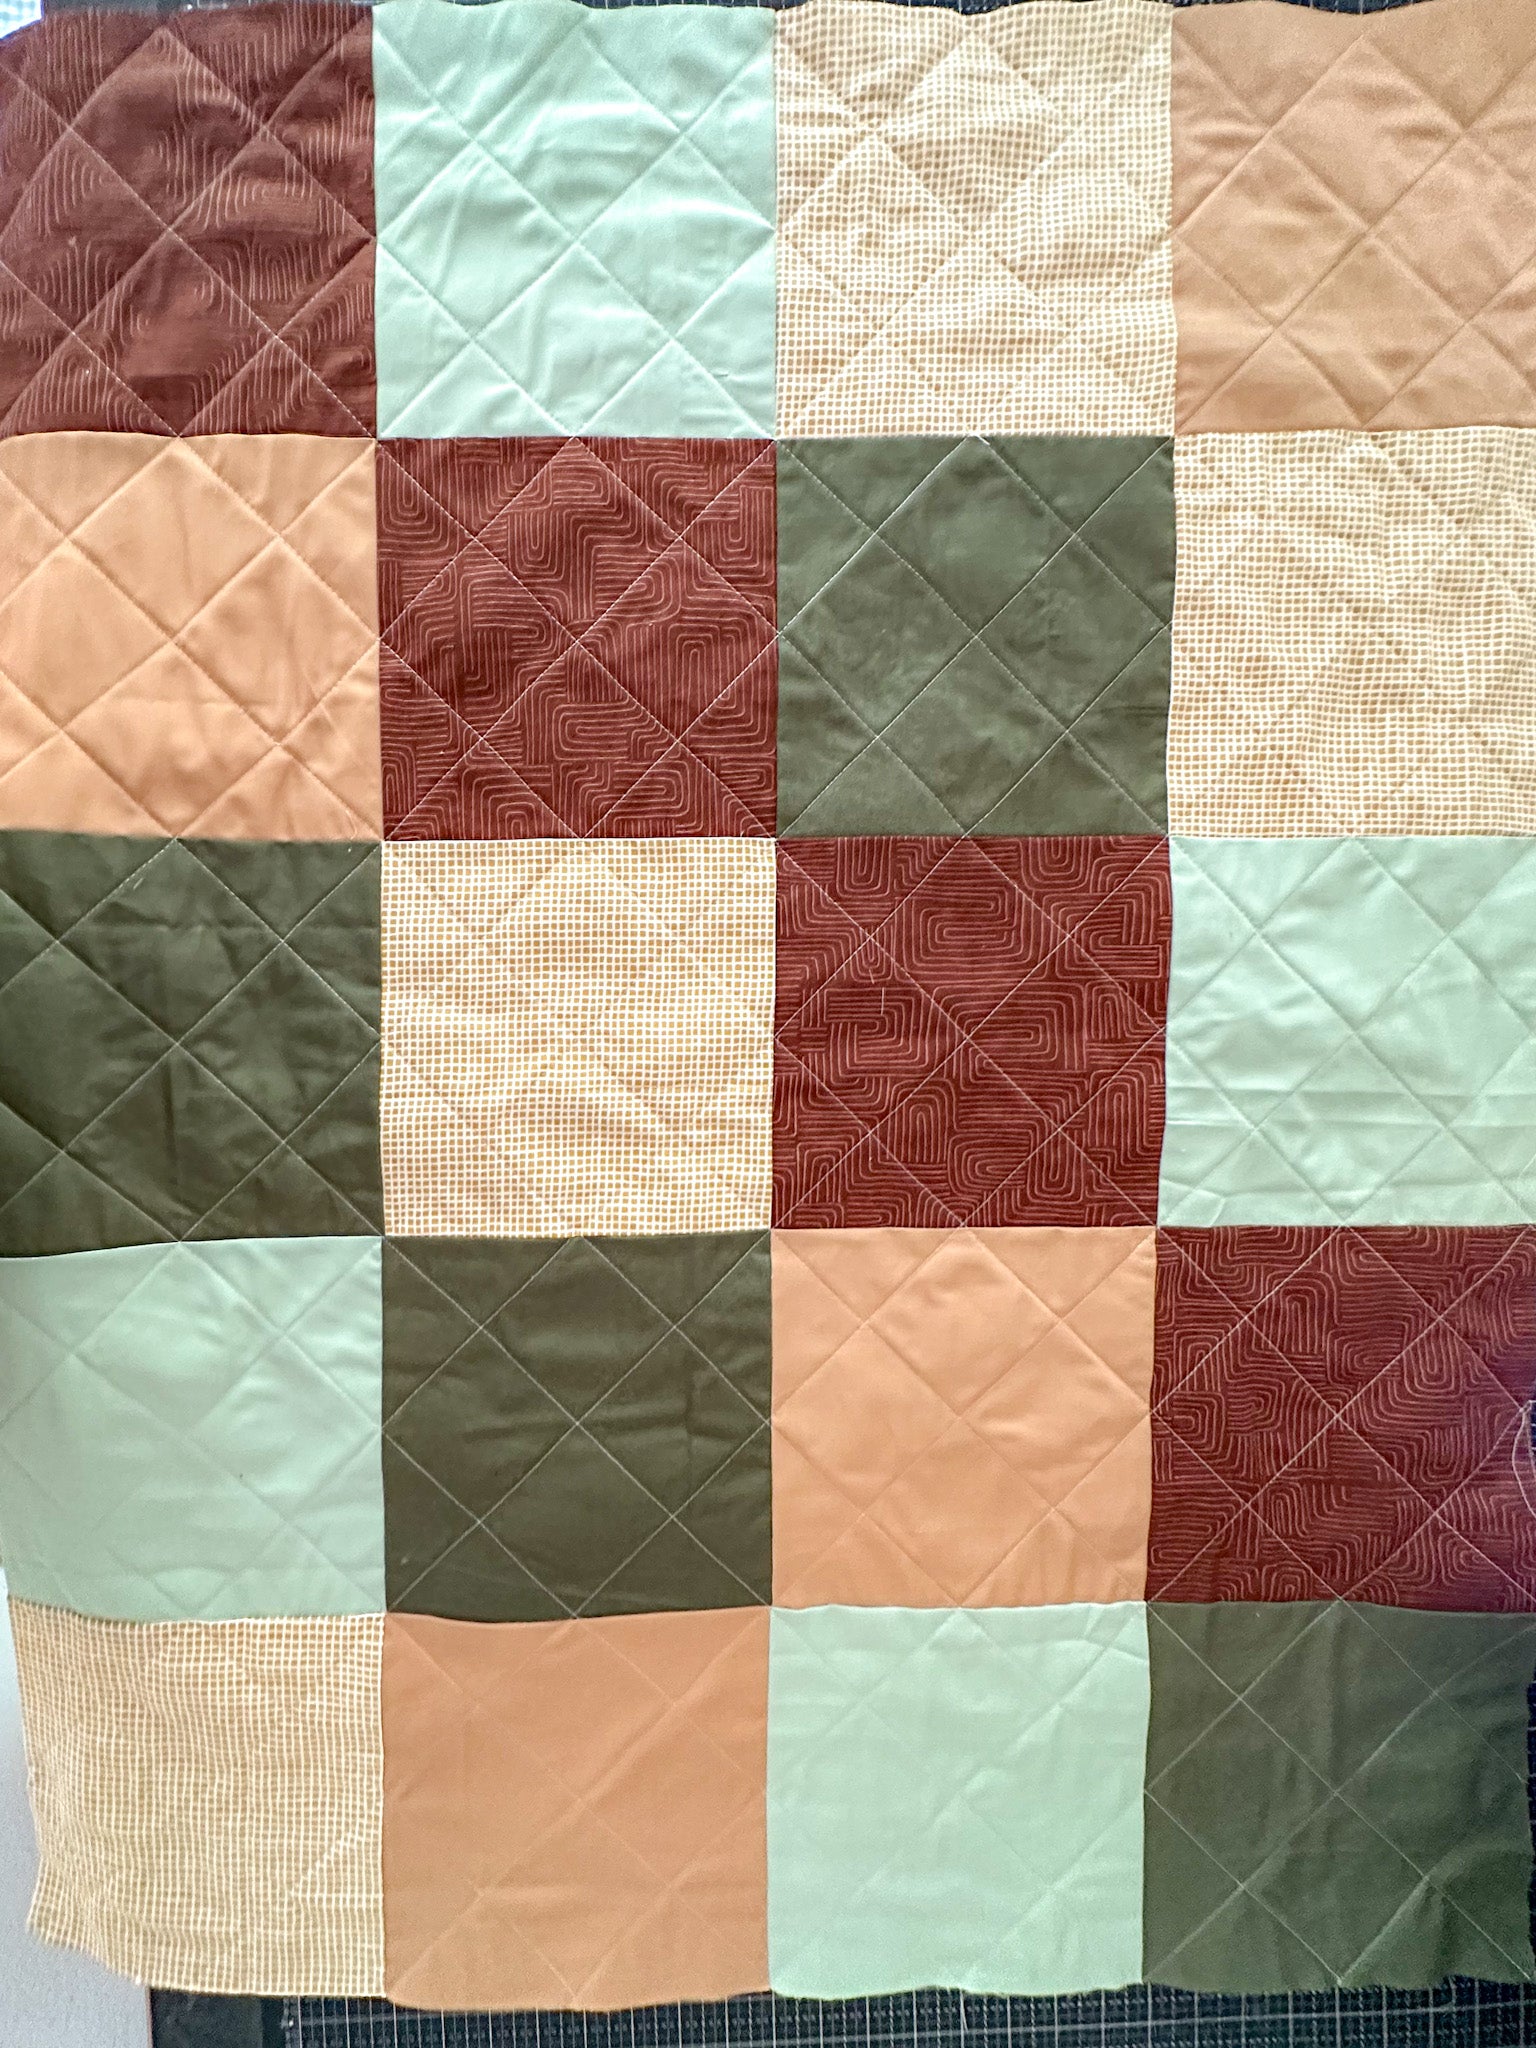
Step 1: Measure Twice, Cut Once!
Measure and cut your fabric in to squares for your desired size. Piece backing (if size requires) and cut 2 batting sections - one to match the quilted top and one to match the backing (bottom/sides of bed). Remember, it's always better to have too much fabric than not enough. You want your dog to have plenty of room to stretch out and snooze in style.
Step 2: Time to Quilt!
Baste your pieced quilt top and batting together, then baste your backing fabric (what will be the bottom and sides of the dog bed) and a separate section of batting together. Use your hera marker and ruler to mark a quilting design (I did a 3" grid"). Quilt as desired.
Step 3: Cutting Corners and Sewing Together
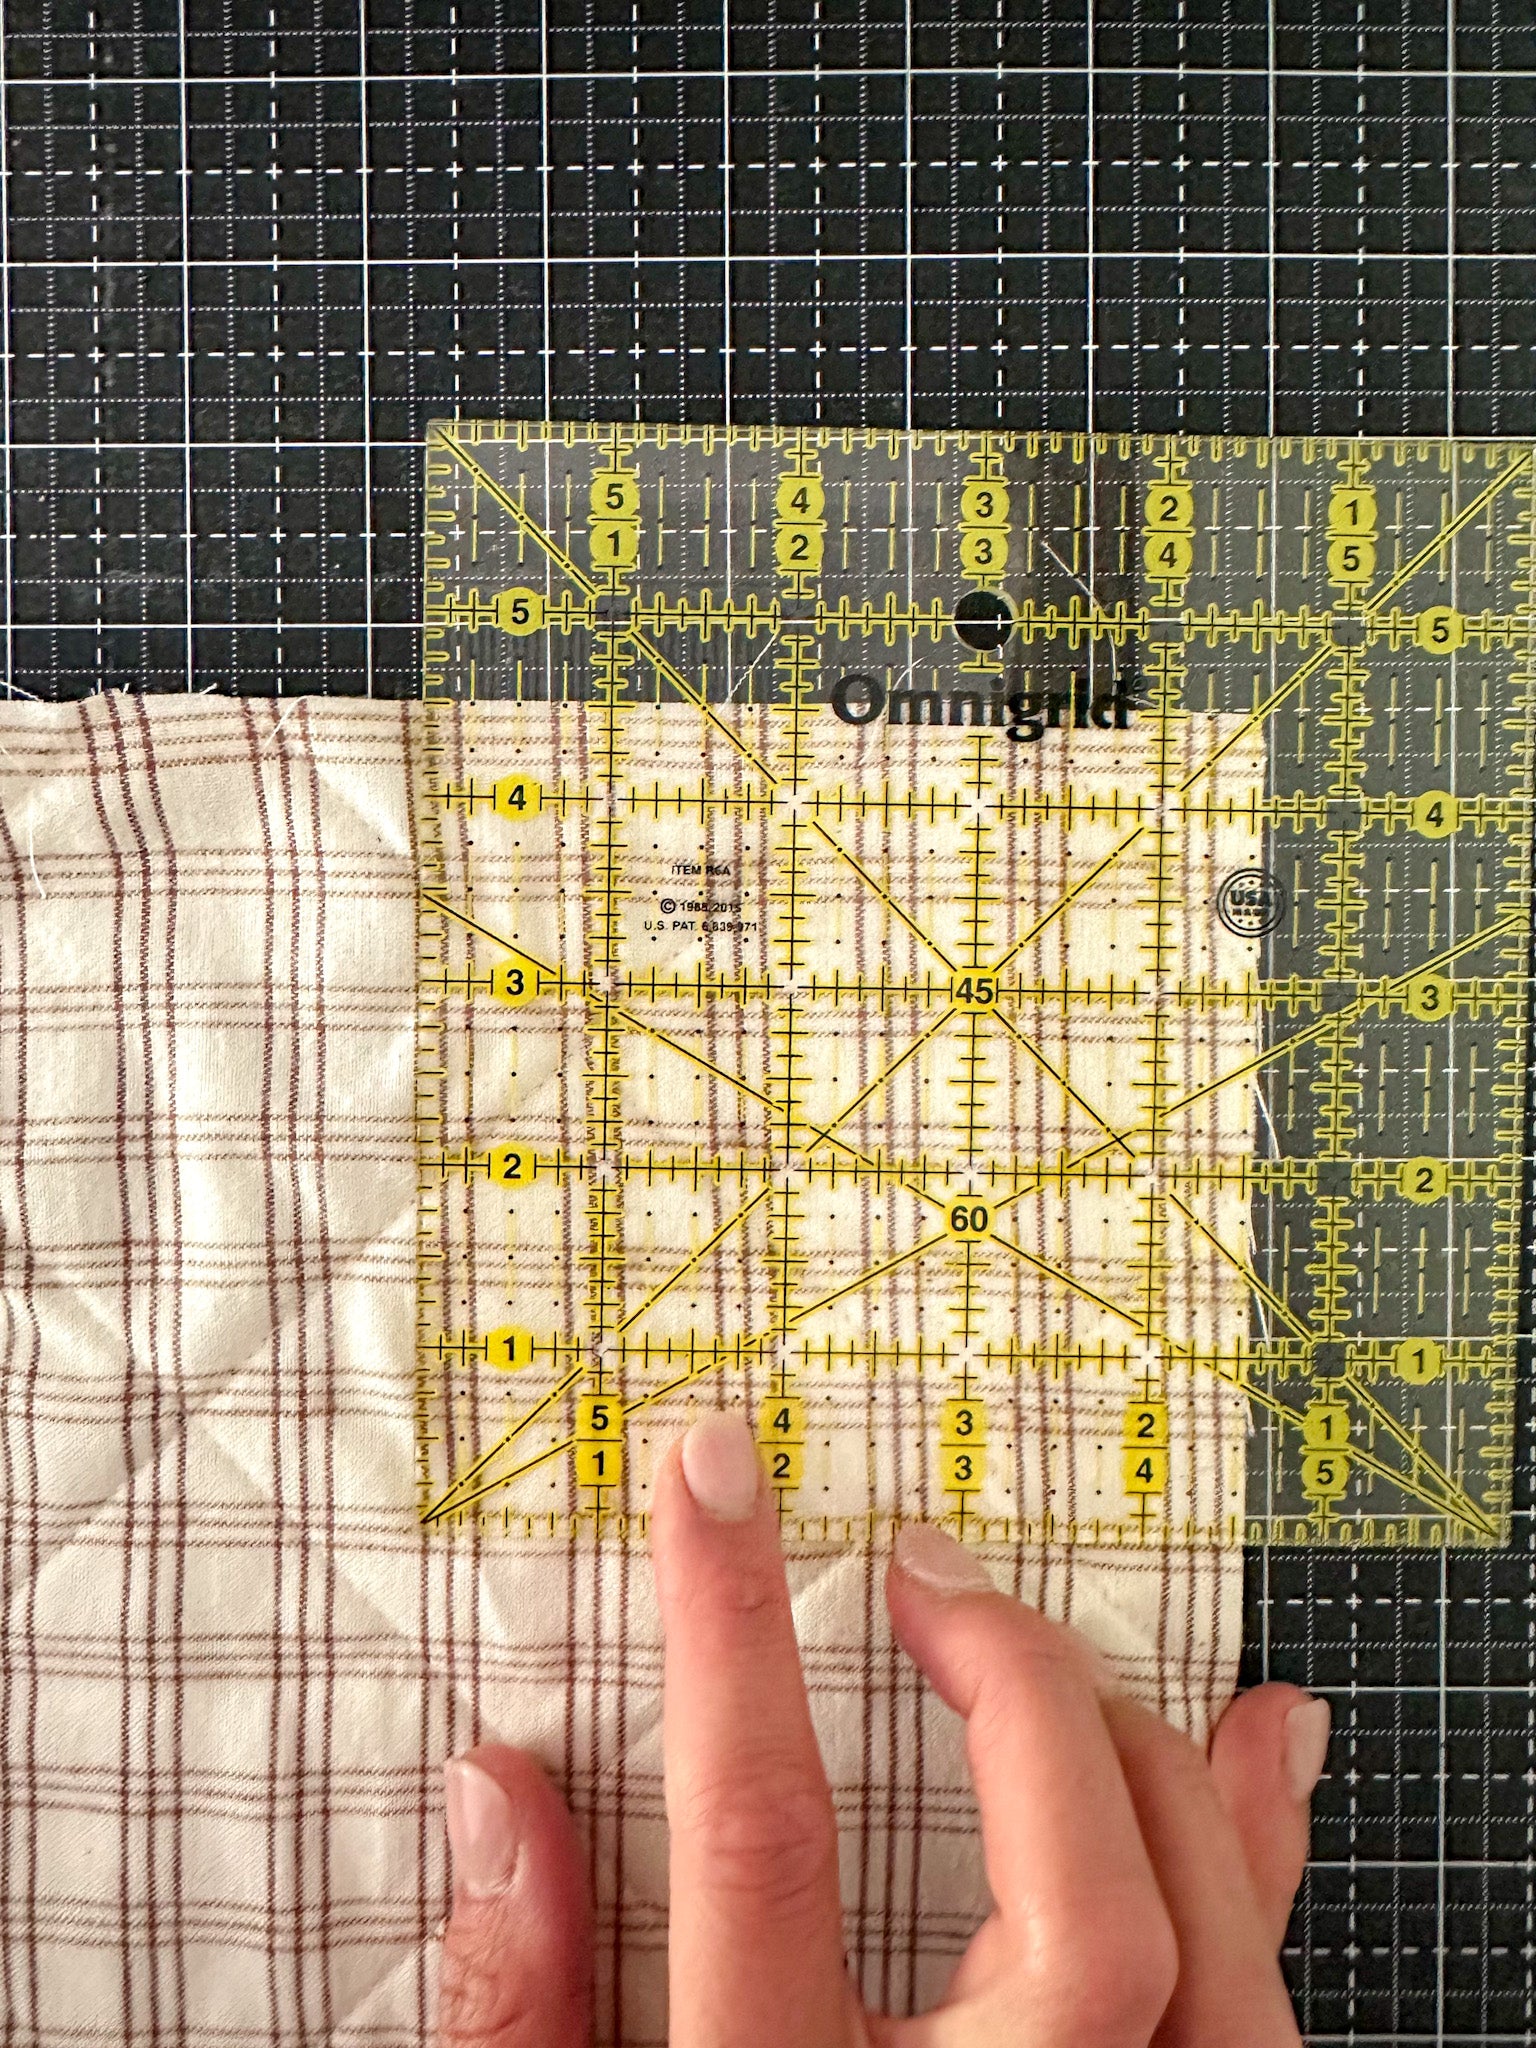
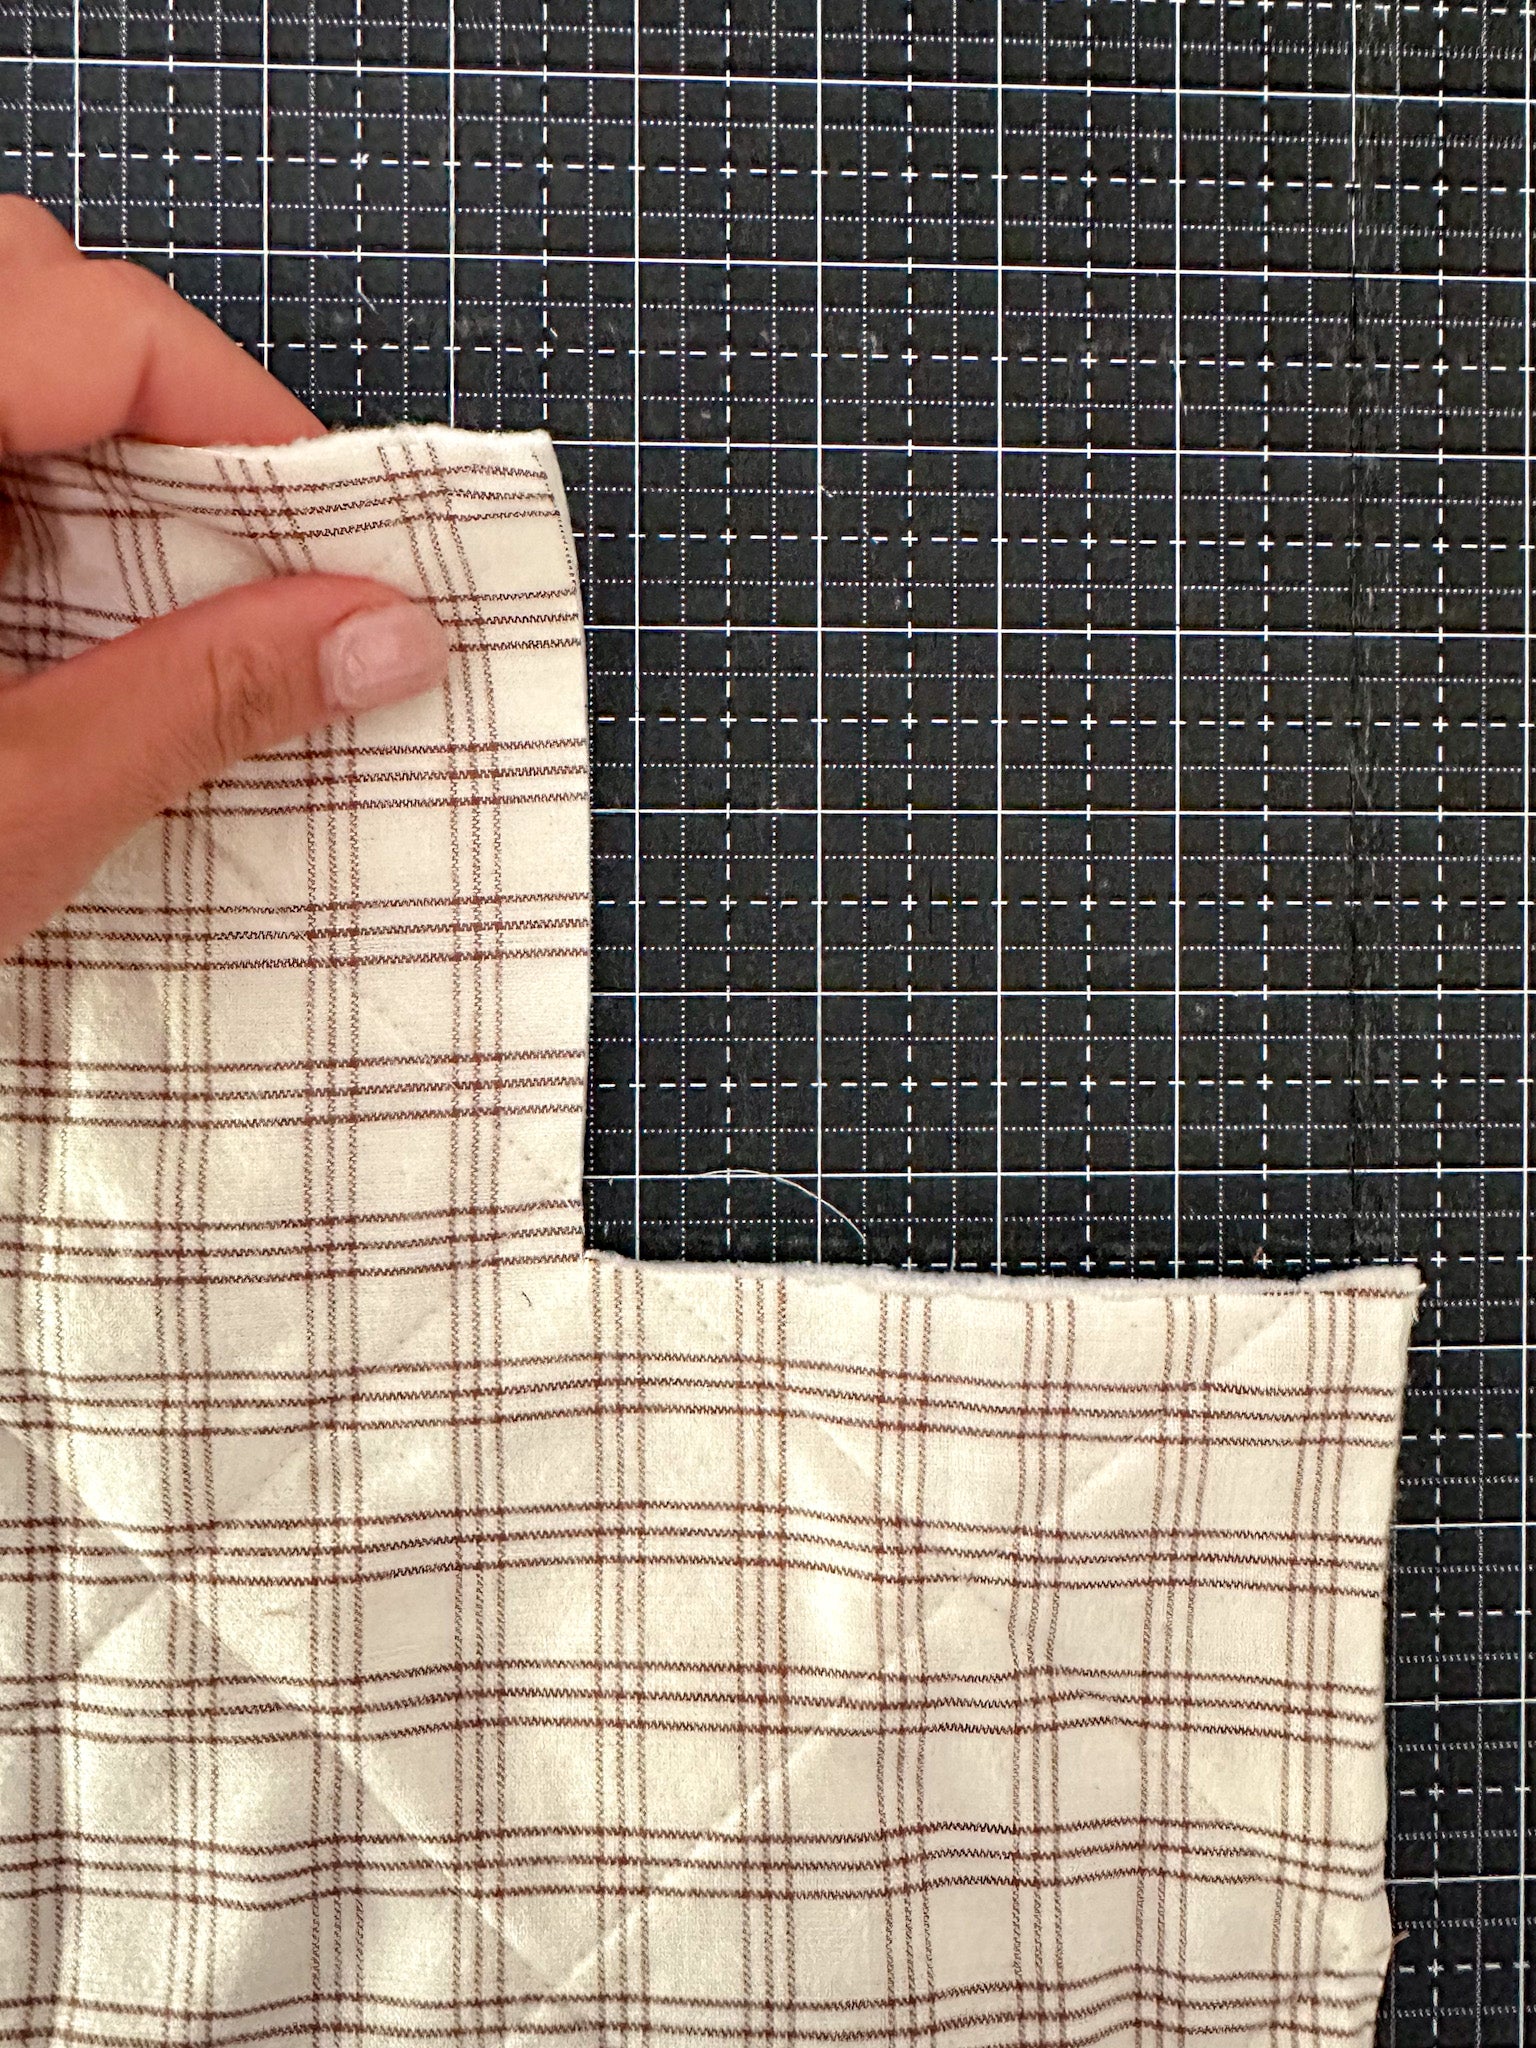
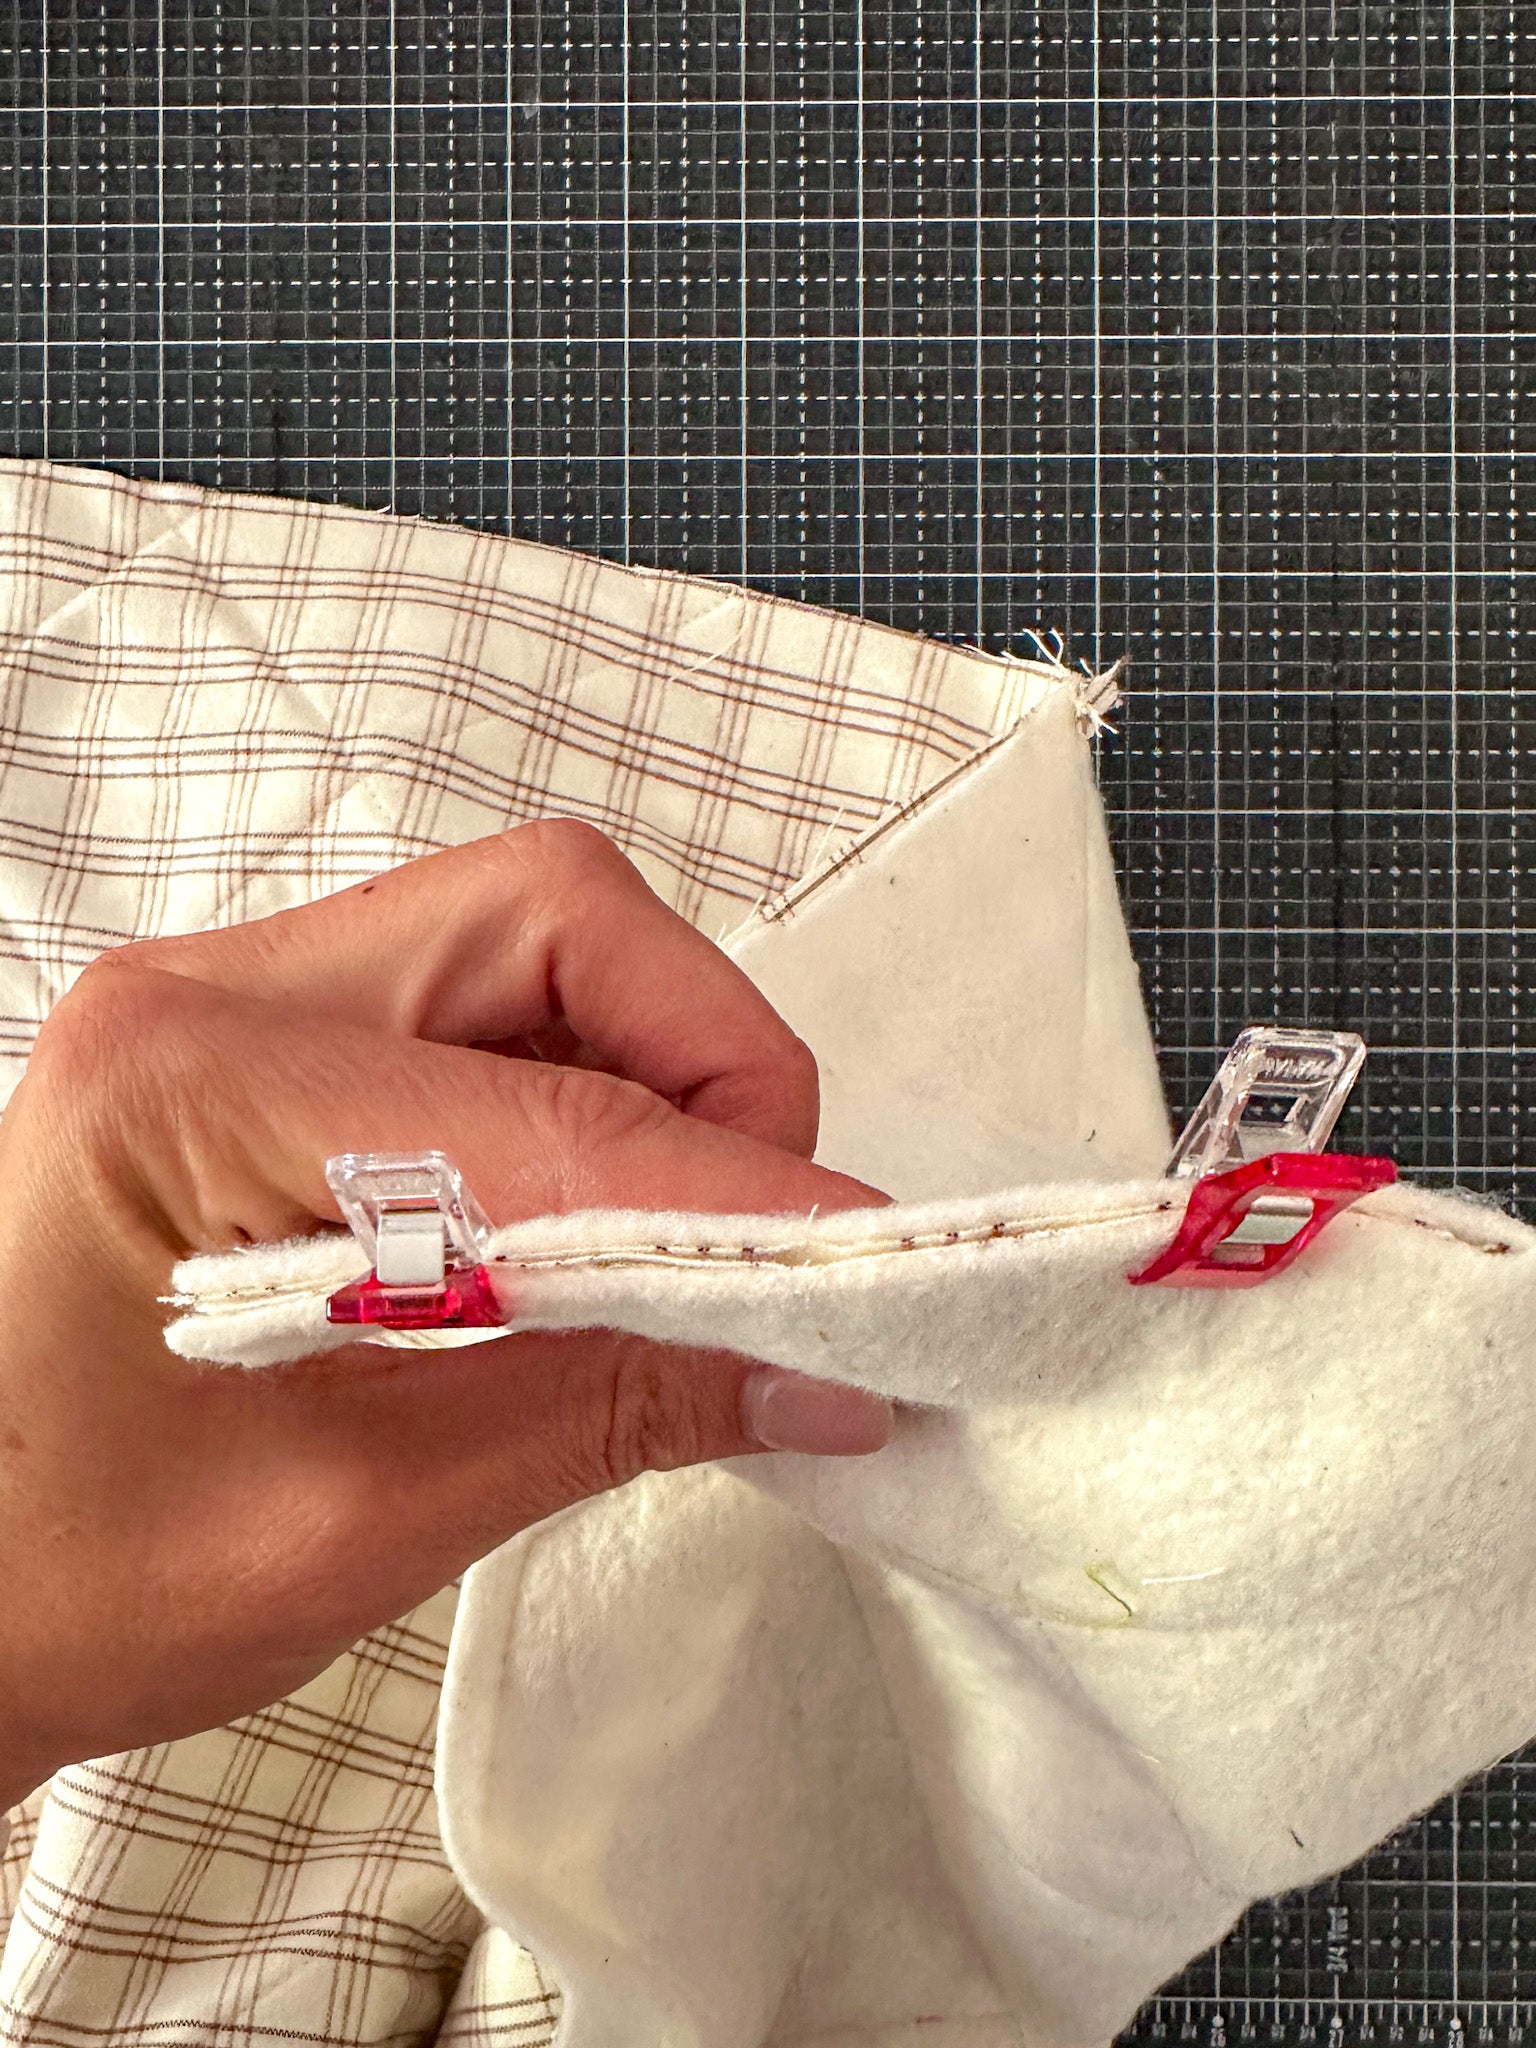
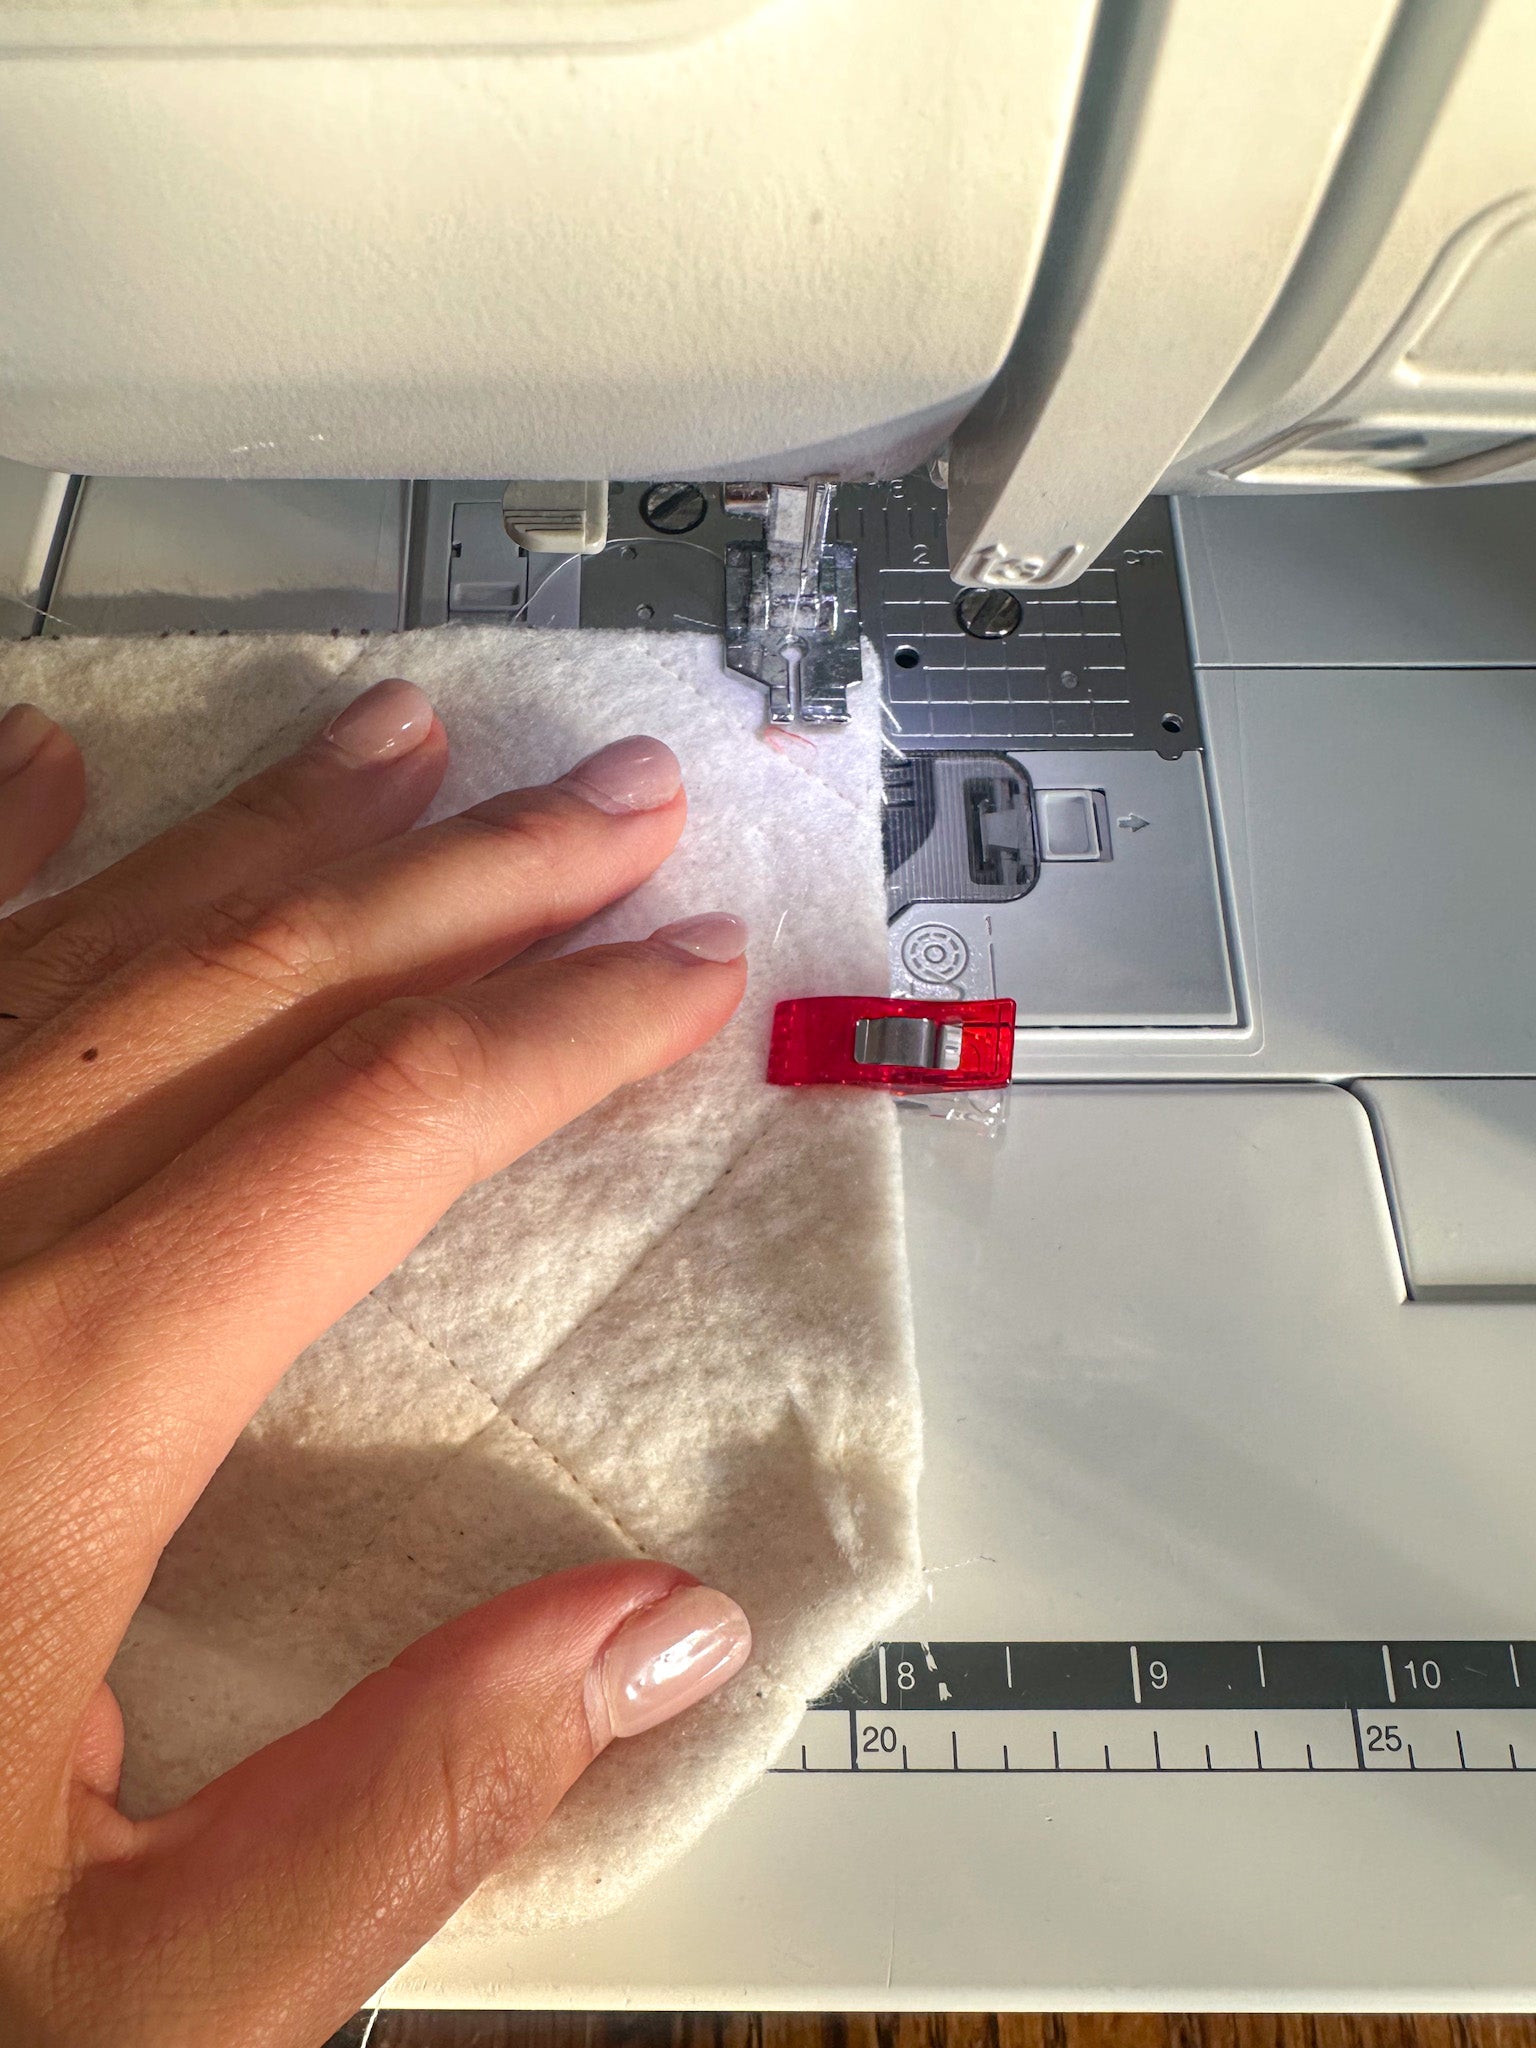
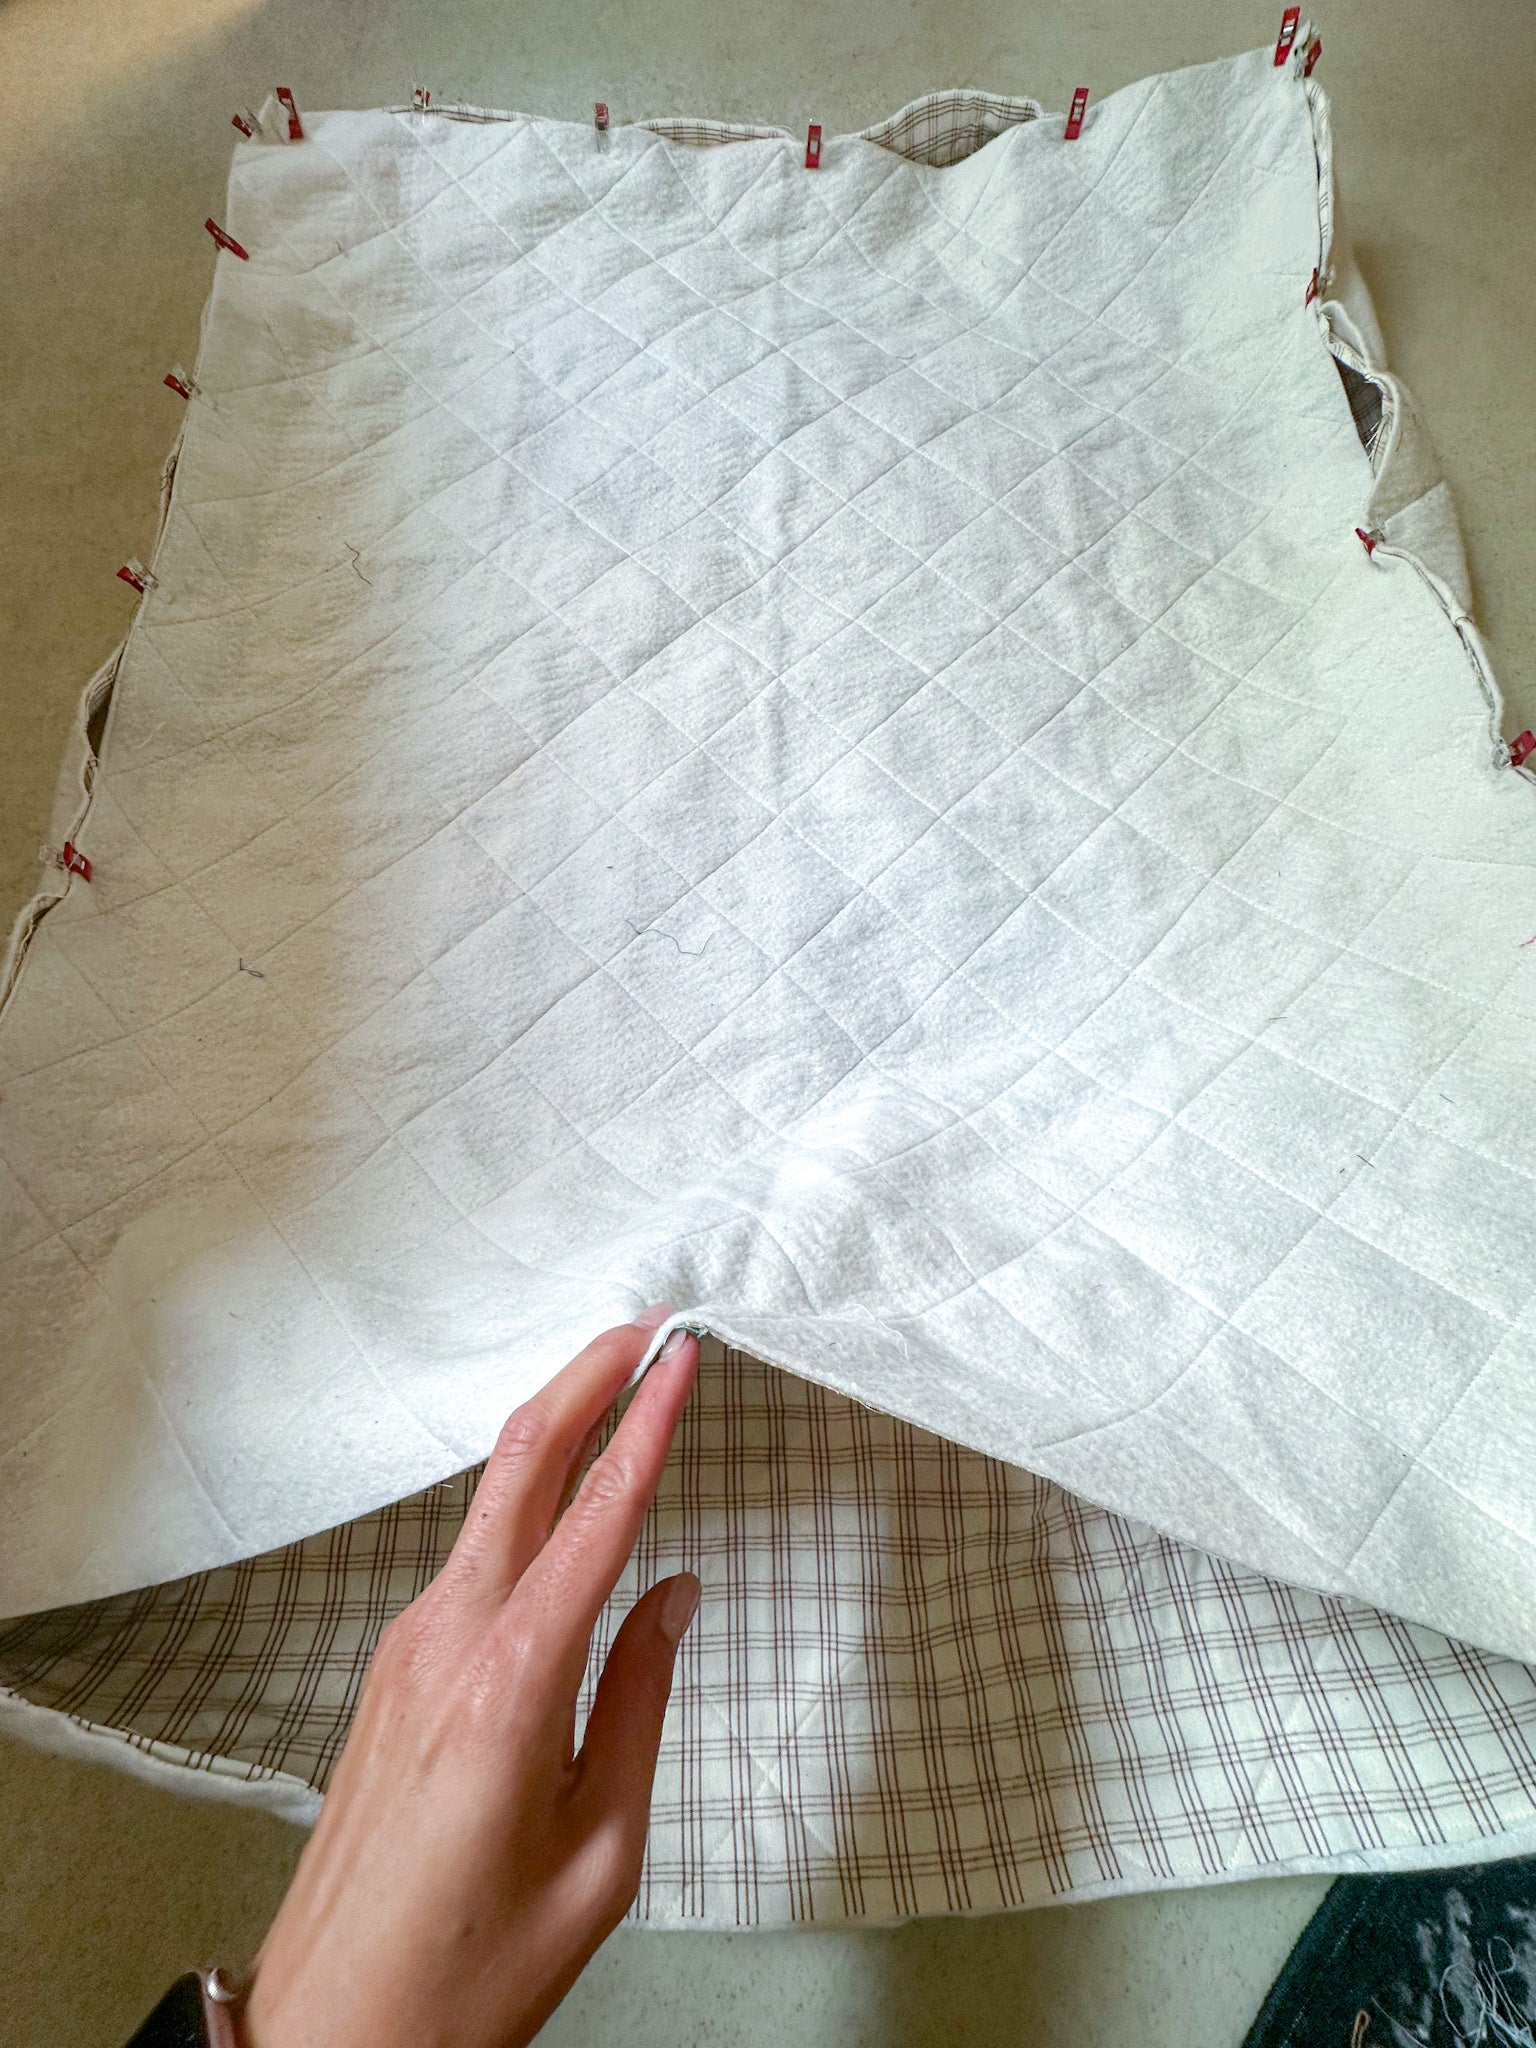
Once you're done quilting, it's time to cut our corners. Take a square ruler and mark a 4.5" square in each corner. Cut out the square and clip edges right sides together (as shown in photo). Sew the edges together.
Next, use the clips to secure the pieced quilt top to the bottom section - this is where the clips will make your life so much easier!! Align the corners first, then clip the sides. Sew together, leaving one of the smaller sides open so you can turn the bed inside out and stuff it with the foam. This is where things might get a little ruff, but don't worry, you've got this!
Step 4: Fluff it Up!
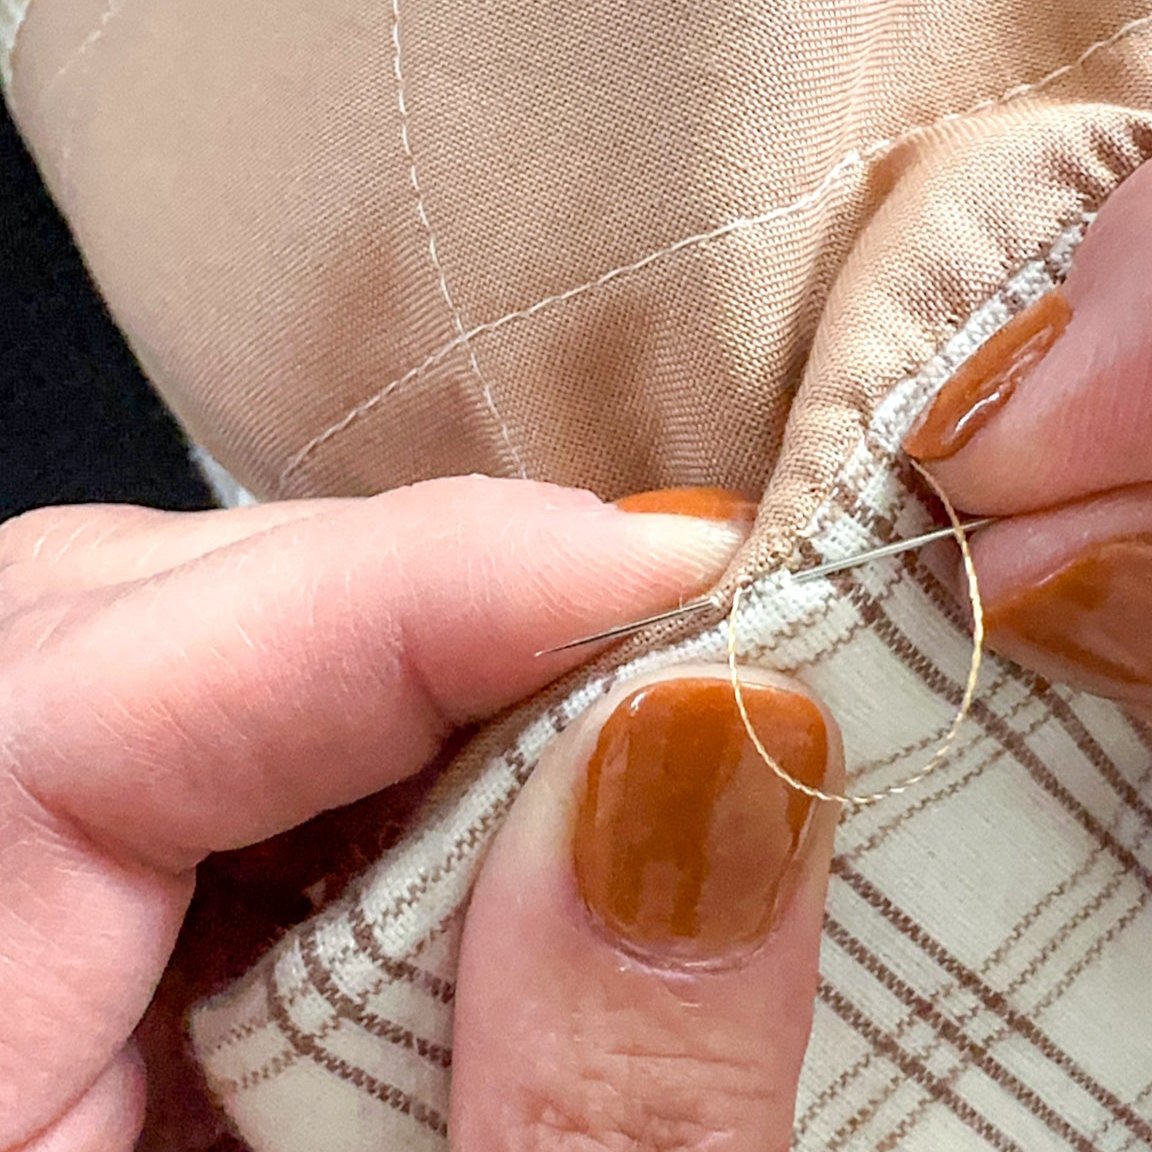
Cut your foam roll to desired size. Stuff the foam into the bed - this will take some maneuvering, but you can do it! After stuffing your bed to the desired fluffiness, sew up the opening. I had to hand stitch the opening closed because it was too difficult to maneuver the stuffed bed into my machine. I used an invisible stitch (also called a "Ladder Stitch") to close the gap. If making the medium or small bed size it will be much easier to use your machine to close the gap.
Step 5: Let Your Pup Enjoy!
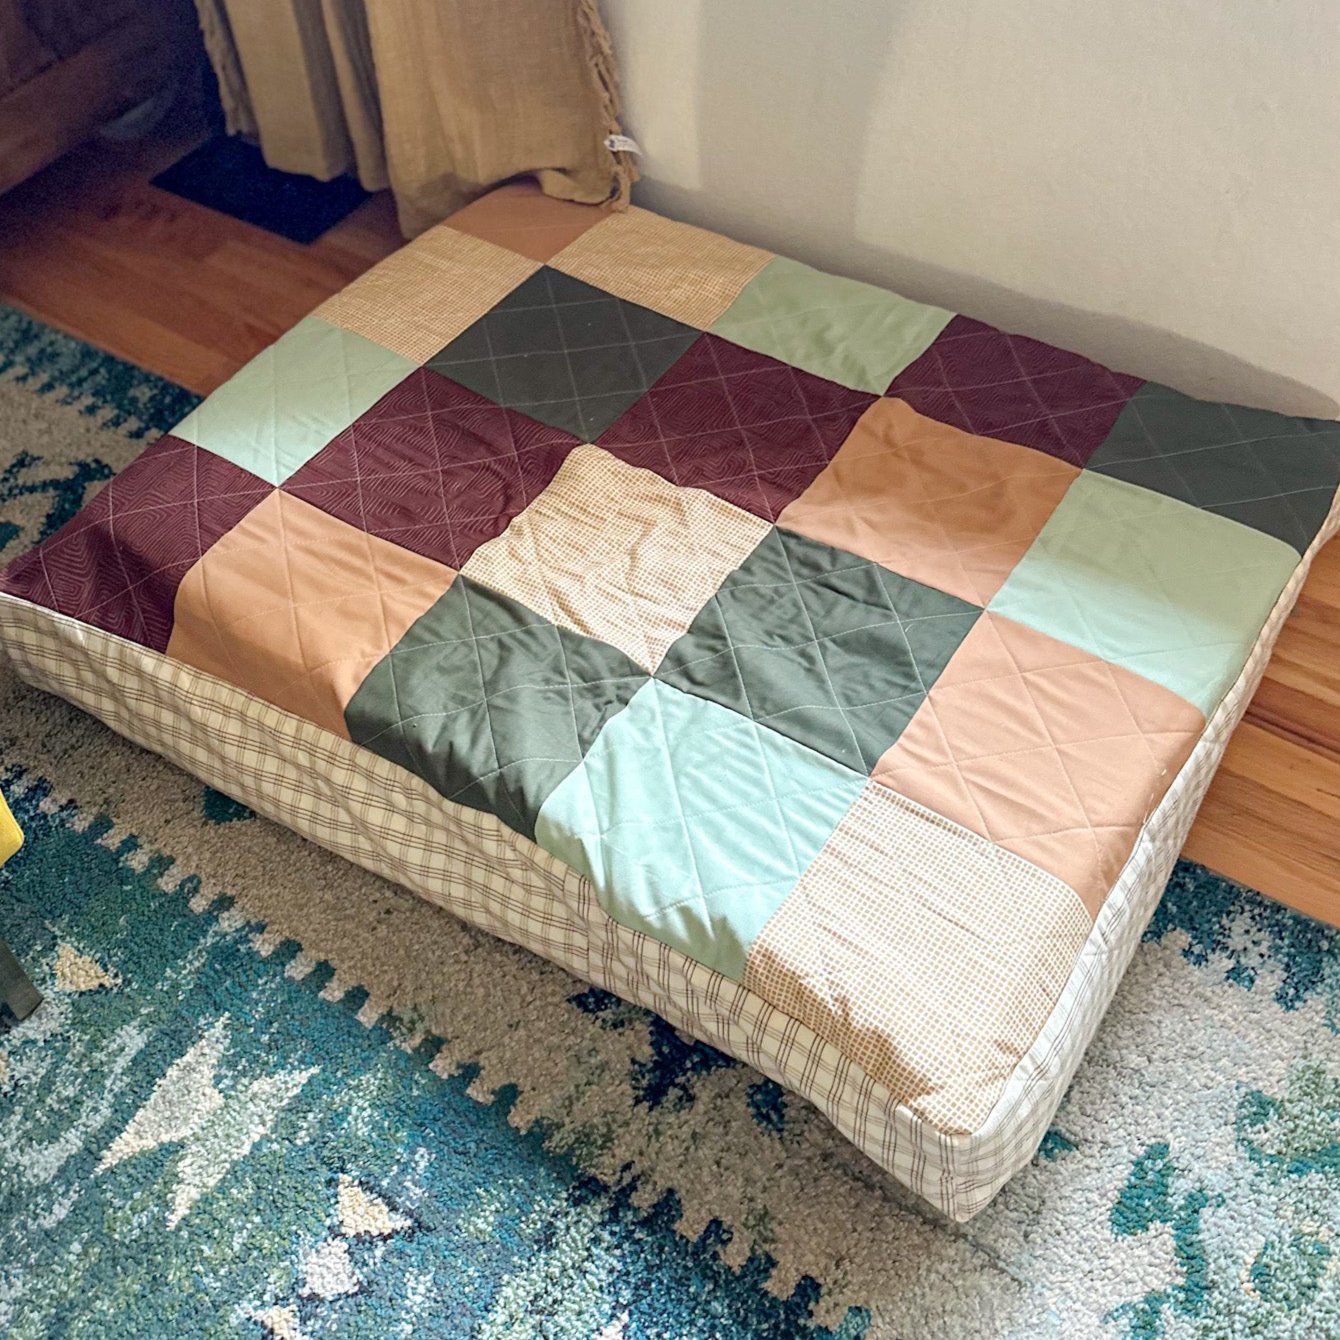
Voilà! Your DIY quilted dog bed is ready for its grand debut. Place it in your pup's favorite spot and watch as they curl up in comfort. You'll feel like a DIY pro and your dog will be forever grateful for their new cozy retreat.
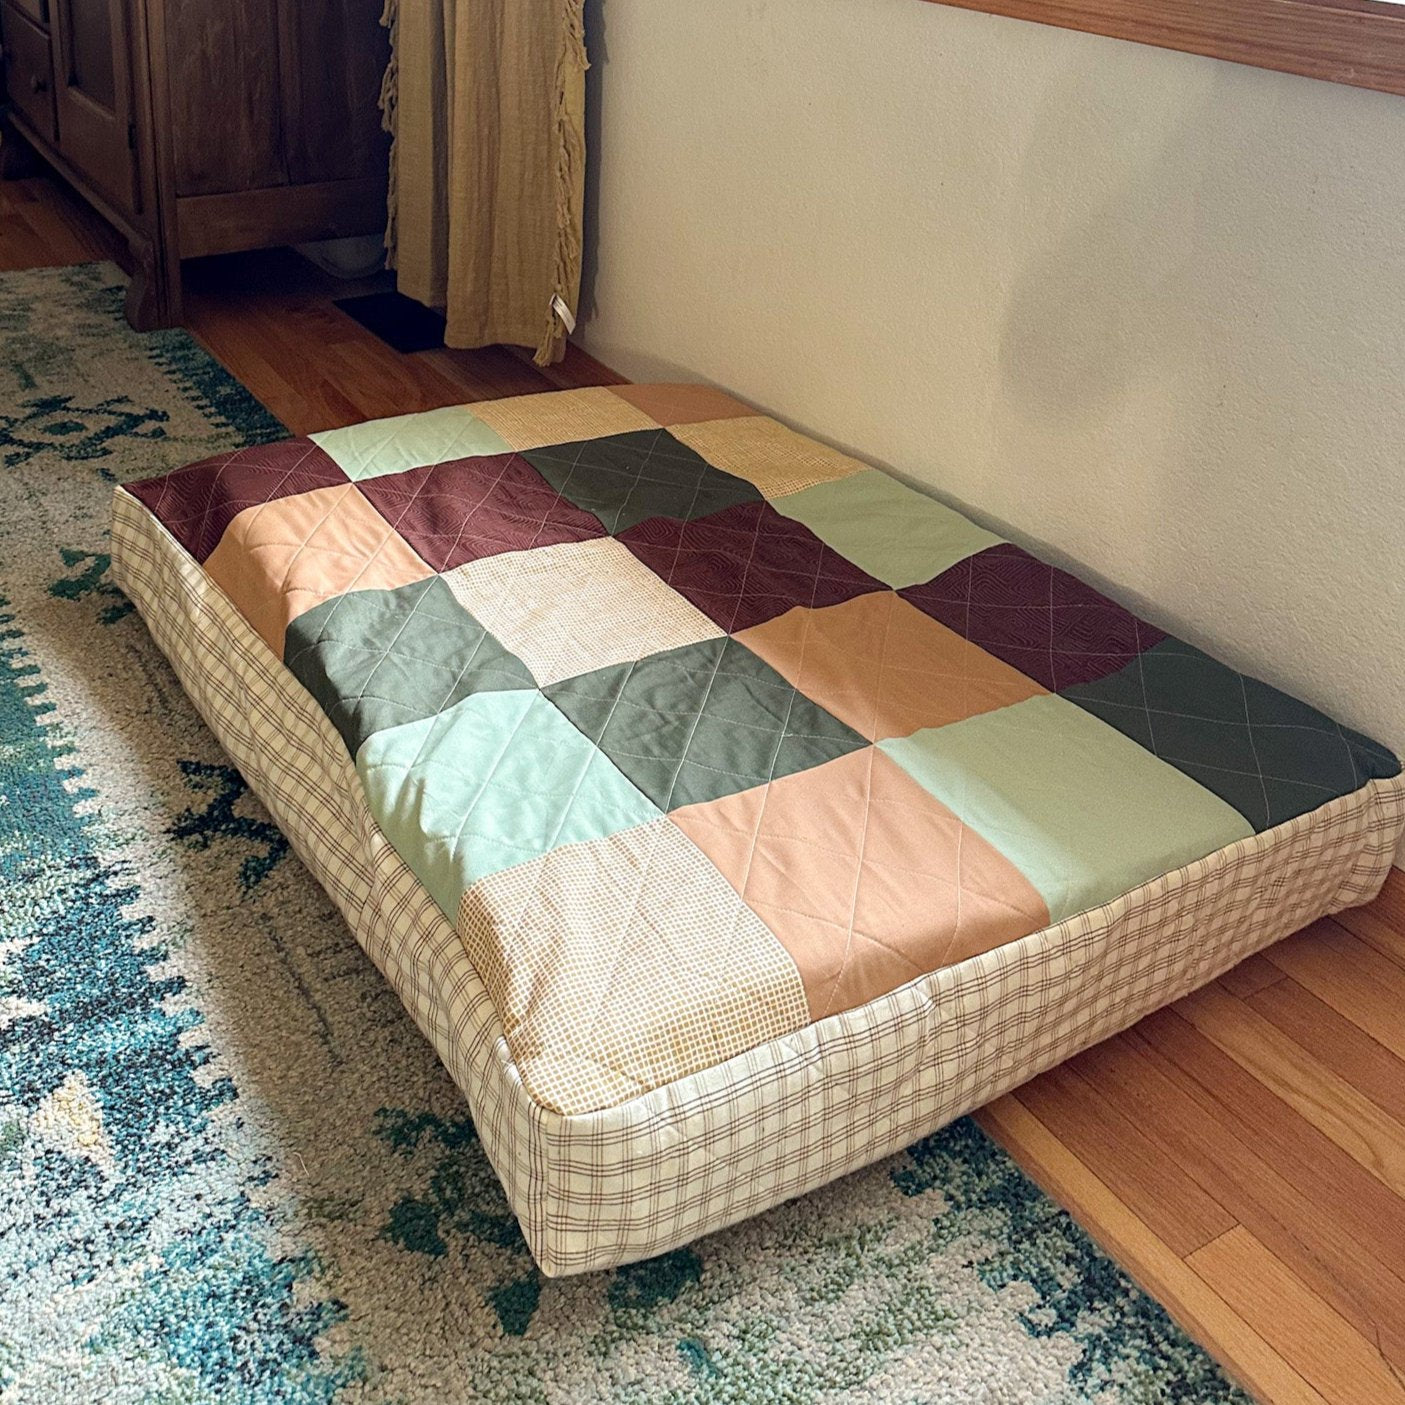
The Final Stretch: Finishing Touches
After all the hard work and creativity you've poured into this project, it's time to add the finishing touches. Make sure all edges are secure and tidy, and give the dog bed a final once-over to ensure it's ready for your pup to enjoy. Place it in your dog's favorite spot and watch them snuggle up in their new, handmade bed.
Wasn’t that easy?!
Tag me in your finished projects (@wellspringdesigns_co) so I can see them. As always, if you have questions or comments, feel free to email me at wellspringdesigns@gmail.com, or comment on this blog post. I love chatting quilting with you guys!

40 comments
在线购买护照(微信:Scottbowers44 )、购买合法美国护照、购买中国护照、(WHATSAPP:+1 (725) 867-9567), 购买加拿大护照、购买香港护照、购买台湾护照、购买外交护照, 合法生物特征护照、购买美国护照、购买澳大利亚护照、购买在政府数据库中注 Telegram: +1 (725) 867-9567 购买中国旅行文件中华人民共和国, 购买中国旅行证件中华人民共和国 Telegram:Zhaochen44
购买中国护照、购买台湾护照,购买香港护照, 购买中国身份证、购买中国驾驶执照、购买中华民国护照、购买中华民国护照、购买中国旅行证件、购买中国签证、在中国购买托福、雅思、托业考试成绩。购买假人民币,购买假人民币
Telegram : https://t.me/buy_real_and_fake_passport
https://buyrealcurrency.com/product/网上出售假美国护照/
https://buyrealcurrency.com/product/buy-real-and-fake-passport/
购买假币。(邮箱:authenticnotes5@gmail.com)购买美元(USD)、人民币(RMB)、(Telegram: 1 (725) 867-9567)、购买加拿大元(CAD)、购买澳元、购买英镑、购买欧元(EUR)、购买港币($HK)。购买高质量未检测的钞票。电报:1 (725) 867-9567
购买假美元、人民币、人民币、马来西亚林吉特等!详情请给我留言!(微信:Scottbowers44)购买假美元和人民币了解更多有关假币的信息!购买假美元和人民币!探索更多!购买假美元和人民币。详情请给我留言!WHATSAPP:+1 (725) 867-9567 购买假美元、人民币、马来西亚林吉特等!详情请给我留言!
在线购买固态硬盘化学溶液,购买固态硬盘化学溶液,固态硬盘化学溶液,(微信:Scottbowers44 ) 亚马逊固态硬盘化学溶液
在线购买固态硬盘化学品,购买固态硬盘化学品,购买J. Solution Chem,购买固态硬盘液体化学品,购买M-Chem Solutions LLC
固态硬盘溶液化学配方,固态硬盘通用溶液,我们购买固态硬盘,购买Z-Chem溶液,固态硬盘化学溶液价格 WhatsApp:+1(740)280-2019
在线购买护照(微信:Scottbowers44)、购买合法美国护照、购买中国护照、(微信:Scottbowers44)、购买加拿大护照、购买香港护照、购买台湾护照、合法生物特征护照、购买美国护照、购买澳大利亚护照、购买在政府数据库中注册的护照、购买加拿大居留许可(RP卡)、获得美国国籍和绿卡,我在哪里可以获得护照?(WHATSAPP:+1 (725) 867-9567)、购买驾照、在线更新护照。
购买托福、雅思、托业(微信:Scottbowers44),购买加拿大公民身份,购买美国公民身份,购买加拿大TCF、TEF、CELPIP、Celta证书,加拿大居留权,直接移民加拿大,购买驾照、身份证,购买美国绿卡、公民身份(WHATSAPP:+1 (725) 867-9567),购买社会安全号码(SSN)、工作许可,获取新身份证、国民保险卡、NIN、SIN,购买SSN,购买结婚证、出生证。在线订购(微微信:Scottbowers44)
您想以新的身份开启第二人生吗?保护您的隐私,创建新的信用记录,绕过犯罪记录检查,重获自由?
微信:Scottbowers44
电报:+1 (725) 867-9567
https://buyrealcurrency.com/
本公司在制作假护照和其他身份证件方面拥有多年经验。我们使用高品质的设备和材料制作假护照。我们精心复制了真护照的所有秘密特征,以制作假证件。我们是优质假身份证件的最佳制造商。
WHATSAPP:+1 (725) 867-9567
电报:+1 (725) 867-9567
邮箱:authenticnotes5@gmail.com
微信:Scottbowers44
https://linktr.ee/counterfeitdocsforsale
https://buyrealcurrency.com/product/网上出售假美国护照/
https://buyrealcurrency.com/product/购买中国护照/
https://buyrealcurrency.com/product/网上出售假美国护照/
https://buyrealcurrency.com/product/在线购买护照/
https://buyrealcurrency.com/product/购买真假护照,在线购买护照,购买美国护照/
https://buyrealcurrency.com/product/购买美国驾驶执照/
https://buyrealcurrency.com/product/网上出售假美国护照/
https://buyrealcurrency.com/product/在线购买护照/
https://buyrealcurrency.com/product/购买真正的美国-英国-中国护照/
https://buyrealcurrency.com/product/在线购买驾驶执照/
https://www.counterfeitdocsforsale.com/buy-real-chinese-passport-online/
购买假币、购买真假护照、申根签证、假身份证、WhatsApp +1(413)7589837、假欧元、假美元。
购买假护照和假钞票、购买DVLA或DMV驾照、网上申根签证、假身份证、假欧元、英镑、假美元。居住证、假加元、购买假俄罗斯卢布、假迪拉姆、购买真假文凭、大学学位和证书。
购买假身份证, 买居住证,买假文凭。
在网上购买雅思证书、购买假毕业证、在网上出售大学学位都合法使用。在https://legitexpressdocuments.com
购买假护照/购买真假护照、购买假身份证。WhatsApp:+1(413)758-9837
最佳假币销售方案-文本/WhatsApp:+1(413)758-9837购买假美元、购买假加元、购买假欧元、购买假英镑。购买假货币购买假护照、驾驶执照、申根签证、购买假证书和文凭、在https://counterfeitcurrencyqueries.com上购买假身份证
您是否希望购买没有公民身份的其他国家的护照?或者,您是否希望在不参加考试的情况下在网上向DVLA和DMV购买注册驾驶执照?Legit Express文档在线。https://legitexpressdocuments.com
购买假美元、假英镑、假欧元、购买假俄罗斯卢布、假迪拉姆AED、在线购买驾照。买假身份证,网上申根签证, 买居住证,买假文凭。在网上购买雅思证书、购买假毕业证、在网上出售大学学位都合法使用。在https://legitexpressdocuments.com
购买假护照、购买假合法驾驶执照、购买真假身份证、购买假签证、购买假居住证、购买假文凭、购买假托福证书、legitexpressdocuments.com购买假毕业证书、购买假雅思证书、在网上购买假注册护照、legitexpressdocuments.com。
购买假工作证、购买假社保号/卡、购买假收养证、购买假解放证、购买假出生证、购买假结婚证、购买假大学学位、购买假申根签证。text/WhatsApp:+1(413)758-9837
购买100%无法检测的假币出售_WhatsApp +1(413)7589837-购买假英镑-欧元纸币、假美元纸币、加元/货币。
购买英国假护照/瑞士假护照销售/美国假护照。
在哪里可以购买真实/假的Passport-Whatsapp +14137589837/无需测试即可购买在线驾驶执照。
高品质的伪钞卖不出去!购买假美元、购买假加元、购买假欧元、购买假欧元、购买假日元、购买假英镑、购买假人民币、购买假澳元/澳元、购买假加元/加元、购买假瑞士法郎/瑞士法郎、购买假港元/港元、购买假新加坡元/新加坡元
请发短信或用WhatsApp到:+1(413)758-9837电报:。网上假币查询:https://counterfeitcurrencyqueries.com
网上购买假钞、购买假美元/美元、购买假欧元/欧元、购买假日元/日元、购买假英镑/英镑、购买假人民币/人民币、购买假澳元/澳元、购买假加拿大元/加元、购买假瑞士法郎/瑞士法郎、购买假港元/港元、购买假新加坡元/新加坡元\。
counterfeitcurrencyqueries.com
购买假瑞典克朗/瑞典克朗,购买假韩元/韩元,购买假挪威克朗/挪威克朗,购买假新西兰元/新西兰元,购买假印度卢比/印度卢比,购买假墨西哥比索/墨西哥比索,购买假新台币/新台币,购买假南非兰特/南非兰特,购买假巴西雷亚尔/巴西雷亚尔。
购买假的丹麦克朗/丹麦克朗,购买假的波兰币,兹罗提/波兰兹罗提,购买假的泰铢/泰铢,购买假的以色列新谢克尔/新谢克尔,购买假的印尼盾/印尼盾,购买假的捷克克朗/捷克克朗。
counterfeitcurrencyqueries.com
购买假的阿联酋迪拉姆/美国缉毒局,购买假的土耳其里拉/土耳其里拉/土耳其里拉,counterfeitcurrencyqueries.com购买假的匈牙利福林,购买假的智利比索/智利比索,购买假的沙特里亚尔/沙特里亚尔,购买假的菲律宾比索/菲律宾比索,购买假的马来西亚林吉特/马来西亚林吉特。
购买假的哥伦比亚比索/哥伦比亚比索,购买假的俄罗斯卢布/卢布,购买假的罗马尼亚列伊/罗安,购买假的秘鲁索尔/笔会,购买假的巴林第纳尔/布列弗,购买假的保加利亚列弗/北格兰,购买假的阿根廷比索。
联系我们:passporthome247@gmail.com
https://legitexpressdocuments.com/shop/
发短信或用WhatsApp到:+1(413)758-9837
电报= RoysmithIT
https://legitexpressdocuments.com
https://counterfeitcurrencyqueries.com/
https://sites.google.com/view/counterfeit-currency-queries/home
你是否在寻找如何从没有公民身份的其他国家购买护照?或者,您是否希望在不进行考试的情况下通过DVLA或DMV在线购买注册驾照?真实的IELTS或TOEFL证书,在线购买优质护照、驾照、身份证、签证、居留许可和文凭。
买假驾照,
买假护照,
购买假的注册护照,
购买合法的假驾照,
买真假身份证,
买假签证,
买假雷西dent 许可证,
购买假文凭,
购买假托福证书,
购买假毕业证书,
购买假雅思证书,
在线购买假注册护照,
购买假工作许可证,
购买假社会安全号码/卡,
购买假收养证明,
购买假解放证,
购买假出生证明,
购买假结婚证,
购买假大学学位,
购买假申根签证,
购买数据库注册的假护照 (WhatsApp +19414045214) _ 购买公民身份文件。购买美国假护照。
购买澳大利亚假护照。
购买比利时假护照。
购买巴西假护照。
购买加拿大假护照。
购买芬兰假护照。
购买法国假护照。
购买德国假护照。
购买荷兰假护照。
购买假以色列护照。
购买假英国护照。
购买假西班牙护照。
购买假墨西哥护照。
购买假南非护照。
购买假瑞士护照。
购买假中国护照。
购买假奥地利护照。
购买假日本护照。
购买假乌克兰护照。
购买假柬埔寨护照。
购买假美国护照。
购买假罗马尼亚护照。
购买假波兰护照。
购买假保加利亚护照。
购买假摩洛哥护照。
购买假挪威护照。
购买假葡萄牙护照。
购买假立陶宛护照。
购买假俄罗斯护照。
购买假匈牙利护照。
购买假澳大利亚护照。
购买假巴西护照。
购买假意大利护照。
购买假牙买加护照。
购买假韩国护照。
购买假克罗地亚护照。
购买假丹麦护照。
购买假马耳他护照。
购买假波兰护照。
购买假瑞典护照。
购买数据库注册的假护照 (WhatsApp +19414045214) _ 购买公民身份证明文件。购买假身份证。
购买美国假身份证。
购买澳大利亚假身份证。
购买比利时假身份证。
购买假身份证。
购买加拿大假身份证。
购买芬兰假身份证。
购买法国假身份证。
购买德国假身份证。
购买荷兰假身份证。
购买以色列假身份证。
购买英国假身份证。
购买西班牙假身份证。
购买墨西哥假身份证。
购买南非假身份证。
购买瑞士假身份证。
购买德国假身份证。
购买中国假身份证。
购买无法检测的假币,在线购买真假护照。
购买无法检测的假币。
购买真假驾驶执照。
购买假钞。
哪里可以买到假美元钞票。
哪里可以买到假钞。
哪里可以买到假钞,
https://counterfeitcurrencyqueries.com
购买假钞。
哪里可以买到假钞。
哪里可以买到假美元钞票。
哪里可以买到假钞。
购买假欧元钞票。
在线购买欧元假钞。
哪里可以买到假英镑。
出售假钞。
出售英国假钞,
https://counterfeitcurrencyqueries.com
出售假欧元钞票。
出售假钞。
哪里可以买到假欧元钞票。
哪里可以买到英镑。
出售假钞。
德国出售假钞。
中国购买货币钞票。
日本哪里可以在线购买欧元钞票。
出售假钱。
出售道具货币,出售假币
https://legitexpressdocuments.com/shop/
短信/WhatsApp:+1(413)758-9837
telegram=RoysmithIT
https://legitexpressdocuments.com
https://counterfeitcurrencyqueries.com/
https://sites.google.com/view/counterfeit-currency-queries/home
Buy counterfeit Money, Buy real and fake Passport, Schengen Visa, fake ID card, WhatsApp +1(413)7589837, fake euro, fake USD.
Buy real and fake Passport and Counterfeit banknotes, Buy DVLA or DMV Driver’s License, online Schengen Visa, fake ID card, fake Euro, GBP, Fake USD. Residence permit, fake CAD, Buy fake Russian Ruble, false dirham, Buy real and fake Diplomas, University degree and certificates, Buy Citizenship document.
Buy authentic US Passport/WhatsApp +14137589837/Buy UK Diplomatic Passport/Buy EU Residence permit.
Buy online IELTS certificate, buy fake Graduation certificates, University degree for sale online all legit to use. At https://legitexpressdocuments.com
Buy fake Passport / Buy real and fake Passports, Buy fake ID. WhatsApp: +1(413)758-9837
Best Counterfeit Bills for Sale – text/WhatsApp: +1(413)758-9837 Buy fake USD, buy fake CAD, buy fake Euro, buy fake GBP. buy fake counterfeit money Buy fake passport, drivers license, schengen visa, buy fake certificates and diplomas, buy fake ID card at https://counterfeitcurrencyqueries.com
Are you looking to buy a passport of any other country without citizenship? or Wanna buy a registered driving license w0ith DVLA, DMV online without taking a test? Legit Express Documents online. https://legitexpressdocuments.com
Purchase fake USD, fake GBP, fake Euros, Buy fake Russian Ruble, false dirham AED, Buy Driver’s License online. Buy fake ID cards, online Schengen Visa, buy Resident Permit, buy fake Diplomas. Buy online IELTS certificate, buy fake Graduation certificates, University degree for sale online all legit to use. At https://legitexpressdocuments.com
Buy fake Registered passports, buy Legit fake Driver’s License, buy real and fake ID cards, buy fake Visas, buy fake Resident Permits, buy fake Diplomas, buy fake TOEFL certificates, legitexpressdocuments.com buy fake Graduation certificates, buy fake IELTS certificates, buy fake Registered passport online, legitexpressdocuments.com .
Purchase fake Working Permit, buy fake Social Security Number/Card, buy fake Adoption Certificates, buy fake Emancipation Document, buy fake Birth Certificates, buy fake Marriage Certificate, buy fake College Degrees, buy fake Schengen visa.text/WhatsApp: +1(413)758-9837
Purchasing 100% Undetectable counterfeit currencies for sale_WhatsApp +1(413)7589837-Buy fake Sterling – Euro bills, fake USD banknotes, CAD/Money.
BUY BRITISH FAKE PASSPORT/SWISS FALSE PASSPORTS SALE/UNITED SATES FAKE PASSPORTS.
Where can i Buy Real/Fake Passport-Whatsapp +14137589837/buy online drivers license without a test.
High quality undetectable counterfeit banknotes for sale! Buy fake USD, buy fake CAD, buy fake Euro, buy fake Euro, buy fake Japanese yen, buy fake Sterling GBP, buy fake Renminbi, buy fake Australian dollar/ AUD, buy fake Canadian dollar/ CAD, buy fake Swiss franc/ CHF, buy fake Hong Kong dollar/ HKD, buy fake Singapore dollar/ SGD
text/WhatsApp: +1(413)758-9837 telegram: . Counterfeit Currency Queries Online. https://counterfeitcurrencyqueries.com
Purchase counterfeit banknotes online, Buy fake US dollar/USD, buy fake Euro/EUR, buy fake Japanese yen/JPY, buy fake Sterling/GBP, buy fake Renminbi/CNY, buy fake Australian dollar/AUD, buy fake Canadian dollar/CAD, buy fake Swiss franc/CHF, buy fake Hong Kong dollar/HKD, buy fake Singapore dollar/SGD\.
counterfeitcurrencyqueries.com
buy fake Swedish krona/SEK, buy fake South Korean won/KRW, buy fake Norwegian krone/NOK, buy fake New Zealand dollar/NZD, buy fake Indian rupee/INR, buy fake Mexican peso/MXN, buy fake New Taiwan dollar/TWD, buy fake South African rand/ZAR, buy fake Brazilian real/BRL.
Purchase fake Danish krone/DKK, buy fake Polish. złoty/PLN, buy fake Thai baht/THB, buy fake Israeli new shekel/ILS, buy fake Indonesian rupiah/IDR, buy fake Czech koruna/CZK.
counterfeitcurrencyqueries.com
buy fake UAE dirham/AED, buy fake Turkish lira/TRY, counterfeitcurrencyqueries.com buy fake Hungarian forint, buy fake Chilean peso/CLP, buy fake Saudi riyal/SAR, buy fake Philippine peso/PHP, buy fake Malaysian ringgit/MYR.
buy fake Colombian peso/COP, buy fake Russian ruble/RUB, buy fake Romanian leu/RON, buy fake Peruvian sol/PEN, buy fake Bahraini dinar/BHD, buy fake Bulgarian lev/BGN, buy fake Argentine peso.Contact us: passporthome247@gmail.com
https://legitexpressdocuments.com/shop/
text/WhatsApp: +1(413)758-9837
telegram= RoysmithIT
https://legitexpressdocuments.com
https://counterfeitcurrencyqueries.com/
https://sites.google.com/view/counterfeit-currency-queries/home
Are you looking for how to buy a passport from any other country without citizenship? Or are you looking for to buy a registered driver’s license with DVLA, or DMV online without taking a test? authentic IELTS or TOEFL certificate, purchase quality passports online, Driver’s licenses, ID cards, Visas, Resident Permits, and Diplomas.
BUY FAKE DRIVING LICENSE,
BUY FAKE PASSPORT,
Buy fake Registered passports,
Purchase Legit fake Driver’s License,
buy real and fake ID cards,
buy fake Visas,
buy fake Resident Permits,
Purchase fake Diplomas,
buy fake TOEFL certificates,
buy fake Graduation certificates,
buy fake IELTS certificates,
buy fake Registered passport online,
Purchase fake Working Permit,
buy fake Social Security Number/Card,
buy fake Adoption Certificates,
Purchase fake Emancipation Document,
buy fake Birth Certificates,
buy fake Marriage Certificate,
Purchase fake College Degrees,
buy fake Schengen visa,
Buy database registered fake Passports (WhatsApp +19414045214) _ Buy citizenship documents. Buy fake passport USA.
Buy fake Australian passport.
Purchase fake Belgian passports.
Buy fake.Brazilian passport.
Buy fake Canadian passport.
Buy fake passport Finlands.
Purchase fake French passport.
Buy fake German passport.
Buy fake Dutch passport.
Purchase fake Israeli passport.
Buy fake UK passport.
Buy fake Spanish passport.
Purchase fake Mexican passport.
Buy fake South African passport.
Buy fake Swiss passport.
Purchase fake Chinese passport.
Buy fake passport Austria.
Buy fake Japanese passport.
Buy fake Ukrainian passport.
Buy fake cambodiens passport.
Purchase fake passport USA.
Buy fake Romanian passport.
Buy fake passport Polish.
Buy fake Bulgarian passport.
Buy fake passport Moroccan.
Purchase fake passport Norwegian.
Buy fake passport Portuguese.
Buy fake Lithuanian passport.
Buy fake Russian passport.
Buy fake passport Hungary.
Purchase fake Australian passport.
Buy fake passport Brazilian.
Buy fake Italian passport.
Buy fake passport Jamaica.
Purchase fake South Korean passport.
Buy fake passport Croatian.
Buy fake passport Denmark.
Buy fake passport Malta.
Buy fake passport Polish.
Purchase fake Swedish passport.
Buy database registered fake Passports (WhatsApp +19414045214) _ Buy citizenship documents. BUY FALSE IDENTITY CARDS.
Buy fake IDs USA.
Buy fake Australian identification cards.
Purchase fake Belgian identity cards.
Buy fake identification cards.
Buy Canadian false ID cards.
Buy fake Finland identity cards.
Buy false French identity cards.
Purchase fake German identification cards.
Buy fake Dutch identification cards.
Buy fake Israeli identity cards.
Buy fake UK IDs.
Buy fake Spanish identification cards.
Buy fake Mexican ID cards.
Buy fake cards of South African identity.
Purchase fake Swiss identity cards.
Buy fake German identity cards.
Buy fake Chinese ID cards.
buy undetectable counterfeit money buy real and fake passport online.
buy undetectable counterfeit money.
Purchase real and fake driver’s licenses.
Buy counterfeit banknotes.
where to buy fake dollar bills.
where to buy counterfeit bills.
where to buy fake bills,
https://counterfeitcurrencyqueries.com
buy counterfeit bank notes.
where to buy fake bank notes.
where can i buy fake dollar bills.
where to buy counterfeit bank notes.
Purchase counterfeit euro bills.
Purchase euro fake bills online.
Where to buy fake British pounds.
fake banknotes for sale.
uk fake bank notes for sale,
https://counterfeitcurrencyqueries.com
counterfeit euro banknotes for sale.
counterfeit bank notes for sale.
Where to buy fake euro bills.
Where to Buy British pounds.
Fake bank notes for sale.
Germany Counterfeit bank notes for sale.
China Buy currency bills.
Japan Where to buy euro bills online.
fake money for sale.
prop money for sale counterfeit money for sale,
https://legitexpressdocuments.com/shop/
text/WhatsApp: +1(413)758-9837
telegram= RoysmithIT
https://legitexpressdocuments.com
https://counterfeitcurrencyqueries.com/
https://sites.google.com/view/counterfeit-currency-queries/home
Buy a US Visa in Philippines / WhatsApp +14137589837 / Buy a Schengen Visa online, Buy EU Residence permit. Buy an authentic US passport, Buy UK authentic Real and fake Diplomatic passports/Buy German diplomatic passport.
Buy Citizenship in Dubai/Fake Drivers licenses Germany/Certificate in Berlin/University Degrees in Switzerland/Schengen visa in EU online, safe delivery 100% discreet services Guaranteed.
Buy Real and fake Passports / WhatsApp +14137589837 Buy forged / second passport, fake ID cards and drivers license
Buy Undetectable counterfeit currencies for sale_WhatsApp +1(413)7589837-Buy fake pound Sterling – Euro bills, fake USD banknotes, CAD/Money.
BUY BRITISH FAKE PASSPORT/SWISS FALSE PASSPORTS SALE/UNITED SATES FAKE PASSPORTS,WhatsApp +1(413)7589837
Are you looking to buy a passport of any other country without citizenship? buy a registered driving license online with DVLA, DMV without taking a test?
{Contact us: passporthome247@gmail.com}
{WhatsApp +14137589837}
{telegram > t.me/RoysmithIT
For documents visit >>
https://legitexpressdocuments.com
For counterfeit money visit>>
https://counterfeitcurrencyqueries.com
For more inquieries visite>>
https://sites.google.com/view/counterfeit-currency-queries/home )
Buy a US Visa in Philippines / WhatsApp +14137589837 / Buy a Schengen Visa online in Philippines
Fake and real Passports for sale/online driver’s licenses/Buy citizenship documents/fake Diplomas/certificates/university Degrees for sale.
Fake and real replica Passports for sale/WhatsApp +19414045214/Buy fake US passports/UK passport/Canadian passport/Buy a replica passport.
Buy Replica Passport/Fake US Passport/False UK Passport/WhatsApp +19414045214/Spanish Passport Prop/Russian Passport Prop/Canadian Passport Prop/German Passport Prop.
Buy real and fake passports, Database registered fake Passports for sale, Buy fake citizenship documents, Buy fake Schengen visa,Online Drivers License for sale,Buy fake Resident permit,Buy fake work permit,Buy fake ID cards, Counterfeit money for sale,Buy fake Diplomas,Buy fake Graduation certificates, IELTS certificates, SSN, Adoption Certificates. Emancipation Document,Buy fake Birth Certificates,Buy fake Marriage Certificate,Buy fake College Degrees,Buy fake Buy fake passport,Buy fake Clone and dump credit cards. Buy fake German passport, buy US passport, Buy Canadian passport, the United Arab Emirates Passport for sale/ Buy fakeID CARD
Buy real & fake passports/WhatsApp +19414045214/Buy Citizenship/Fake Drivers licenses
BUY FAKE DRIVING LICENSE,
BUY FAKE PASSPORT,
buy Legit fake Driver’s License,
buy real and fake ID cards,
buy fake Visas,
buy fake Resident Permits,
buy fake Diplomas,
buy fake TOEFL certificates,
buy fake Graduation certificates,
buy fake IELTS certificates,
buy fake Registered passport online,
buy fake Working Permit,
buy fake Social Security Number Card,
buy fake Adoption Certificates,
buy fake Emancipation Document,
buy fake Birth Certificates,
buy fake Marriage Certificate,
buy fake College Degrees,
buy fake Schengen visa,
Buy fake Australian passport.
Buy fake Belgian passports.
Buy fake.Brazilian passport.
Buy fake Canadian passport.
Buy fake passport Finlands.
Buy fake French passport.
Buy fake German passport.
Buy fake Dutch passport.
Buy fake Israeli passport.
Buy fake UK passport.
Buy fake Spanish passport.
Buy fake Mexican passport.
Buy fake South African passport.
Buy fake Swiss passport.
Buy fake Chinese passport.
Buy fake passport Austria.
Buy fake Japanese passport.
Buy fake Ukrainian passport.
Buy fake cambodiens passport.
Buy fake passport USA.
Buy fake Romanian passport.
Buy fake passport Polish.
Buy fake Bulgarian passport.
Buy fake passport Moroccan.
Buy fake passport Norwegian.
Buy fake passport Portuguese.
Buy fake Lithuanian passport.
Buy fake Russian passport.
Buy fake passport Hungary.
Buy fake Australian passport.
Buy fake passport Brazilian.
Buy fake Italian passport.
Buy fake passport Jamaica.
Buy fake South Korean passport.
Buy fake passport Croatian.
Buy fake passport Denmark.
Buy fake passport Malta.
Buy fake passport Polish.
Buy fake Swedish passport.
Buy fake IDs USA.
Buy fake Australian identification cards.
Buy fake Belgian identity cards.
Buy fake identification cards.
Buy Canadian false ID cards.
Buy fake Finland identity cards.
Buy false French identity cards.
Buy fake German identification cards.
Buy fake Dutch identification cards.
Buy fake Israeli identity cards.
Buy fake UK IDs.
Buy fake Spanish identification cards.
Buy fake Mexican ID cards.
Buy fake cards of South African identity.
Buy fake Swiss identity cards.
Buy fake German identity cards.
Buy fake Chinese ID cards.
Buy fake Spanish identification cards.
Buy fake Austrian identification cards.
Buy fake Japanese identification cards.
Buy fake Ukrainian identification cards.
Buy fake cambodiens identity cards.
Buy fake UK identification cards.
Buy fake USA IDs.
Buy fake Romanian identification cards.
Buy fake Polish identification cards.
Buy fake cards Bulgarian ID.
Buy fake Moroccan identification cards.
Buy fake chypre identity cards.
Buy fake Norwegian identity cards.
Buy fake Portuguese identification cards.
Buy fake Lithuanian identity cards.
Buy fake Russian identification cards.
Buy fake Hungary identification cards.
Buy fake Australia identity cards.
Buy fake Brazilian identity cards.
Buy fake Italian identification cards.
Buy a US Visa in Philippines / WhatsApp +14137589837 / Buy a Schengen Visa online in Philippines
Buy fake South Korea identification cards.
Buy fake Croatian identification cards.
Buy fake Denmark identity cards.
Buy fake Maltese identification cards.
Buy fake Polish identification cards.
Buy fake Swedish identity cards.
BUY FAKE DRIVING LICENSE.
Buy fake Australian driving licenses.
Buy fake Canadian driver’s license.
Buy fake French driving license.
Buy fake Dutch driving licenses.
Buy fake German driving license.
Buy fake driving license in UK.
Buy fake Chinese driving license.
Buy fake Swiss driver’s license.
Buy fake cambodiens driving license.
Buy fake Australians driving license.
Buy fake Russian driving license.
Buy fake international driving permits.
Buy fake Japanese driver’s license.
{Contact us: passporthome247@gmail.com
WhatsApp +14137589837
()
telegram= t.me/RoysmithIT
Telegram @kevinlongs261
Telegram +16265412642
Whatsapp +1 (971) 238-3715
SIGNAL : +16265412642
Buy Counterfeit Euro Online
Fake Euro Money For Sale
Whatsapp +1 (971) 238-3715
Best counterfeit money for sale
https://premiummonetarycoltd.com/best-counterfeit-money-for-sale/
https://premiummonetarycoltd.com/best-counterfeit-money-for-sale/
https://premiummonetarycoltd.com/product/buy-fake-euros-online/
I enjoy what you guys are up too. This type of clever work and exposure!
Keep up the great works guys I’ve included you guys
realistic money for sale
Best counterfeit money for sale
contact us premiummonetarycoltd.com Buy undetectable counterfeit money online
Best place to buy counterfeit money online
Visit premiummonetarycoltd.com to Buy High Quality Counterfeit Money Online